Nicolas Baptista

OnClick inside OnClick with React

While doing some test after putting the event OnClick in a DIV inside another DIV with the Onclick event, I was not able to trigger the OnClick event that was inside the other.

<div id="div1" style={{background: 'red'}} onClick={() => { 
setClicked('div1');
}>
  DIV 1
  <div id="div2" style={{background: 'green'}} onClick={() => { 
  console.log('you clicked div2');
  setClicked('div2');
  }>
    DIV 2
  </div>
</div>
When we click on the DIV 2, it triggers the DIV 1 onClick event

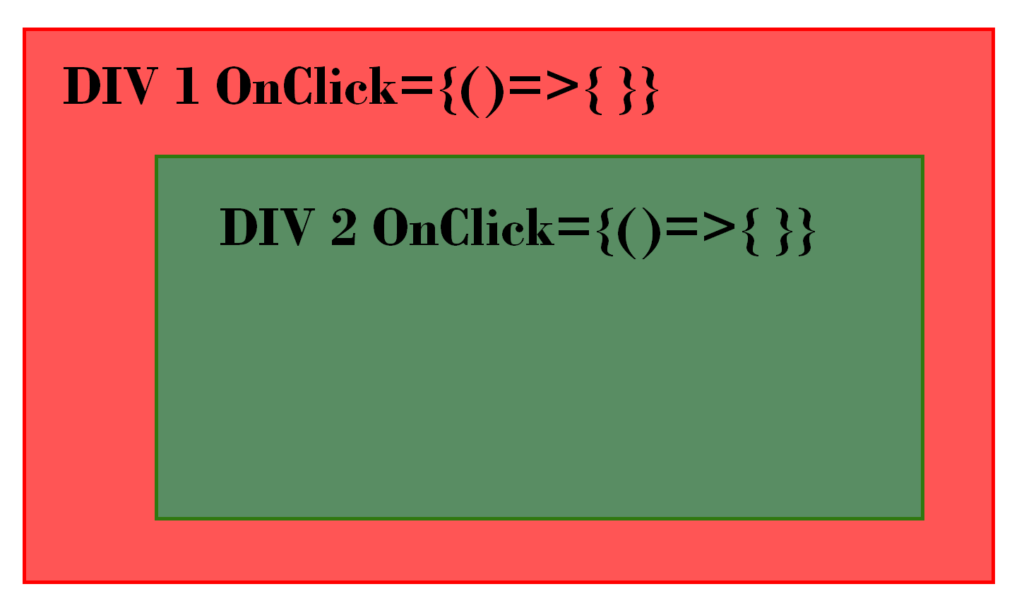
If you click on the green div, and then, if you check the logs you see that the log is working, you triggered the event.
But, if you check your state, you will see that it’s div1, and not div2, but you clicked DIV 2.
Your click action has been propagate to the DIV 2.

How to solve the problem

In order to solve this problem, we will need a fix. So we can trigger both events.
The problem is that the click action is propagate to the the other div.
So, we need to check when you trigger the onClick action that the user clicked on the good one.
To do so, we can add the following instructions in the inner DIV:

if(event.target !== event.currentTarget) return;

Which will give:

<div id="div1" style={{background: 'red'}} onClick={(event) => { 
if(event.target !== event.currentTarget) return;
setClicked('div1');
}>
  DIV 1
  <div id="div2" style={{background: 'green'}} onClick={() => { 
  console.log('you clicked div2');
  setClicked('div2');
  }>
    DIV 2
  </div>
</div>

With buttons inside a DIV with 3 levels DIV

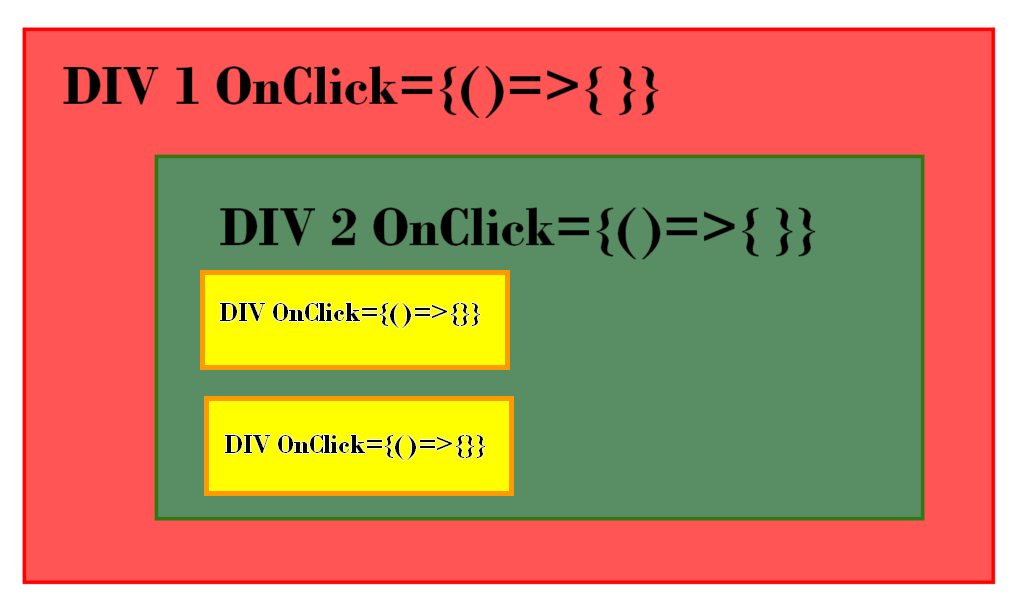
If you have 3 levels of DIV and you want only the action of the button of the div the be triggered then you can use the following instruction in the end of the OnClick:

<div id="div3" style={{background: 'yellow'}} onClick={(event)=>{
...
event.stopPropagation();
}}/>

stopPropagation will stop the click event and so the second OnClick event will not be triggered.

Detect languages with PHP

If you have a standard website with CMS such Drupal, WordPress, phpBB… You may want to detect language in some pages.
To do so, you can use the following PHP function :

$_SERVER['HTTP_ACCEPT_LANGUAGE']

You should create an array of all the accepted languages, for example let’s say it’s French, English, Portuguese and Russian :

$acceptLang = ['fr', 'en', 'pt', 'ru'];

Then, you can set a default language, usually English the universal language, and detect if it’s in the array. Which will give:

$lang = substr($_SERVER['HTTP_ACCEPT_LANGUAGE'], 0, 2);
$acceptLang = ['fr', 'en', 'pt', 'ru'];
$lang = in_array($lang, $acceptLang) ? $lang : 'en';

Finally, in your code, you can use the value of the $lang variable to change the value of your text according the the selected language.

Inline function javascript to put cookies without JQuery

If you are using basic pages such landing pages, is it possible that you still use basic languages such HTML/CSS/Javascript.
Here is an example of putting cookies and a log of the cookies with an inline function:

<a style="cursor: pointer;" onclick='(function() {
  document.cookie = "cookie=value"; 
  console.log( "cookies:", document.cookie ); 
})()'>
  Click Me 
</a>

Because we are not using href but onlick, I added the cursor style of pointer so the user can know he can click.

Install MariaDB on a Fedora/CentOS/RedHat server

If you have your own server, the first thing you may want to do with your backend shoud be to install a database server on it.

Here is step by step how to install a MySQL/MariaDB (almost the same) database on your server:
Install the MariaDB service:

yum install mariadb mariadb-server

Create your user access – change the username and password you want:

mysql
CREATE USER username@'%' IDENTIFIED BY 'password';
GRANT ALL PRIVILEGES ON *.* TO 'username'@'%' ;
flush privileges;

Verify the user has been created:

SELECT User FROM mysql.user;

You should be able to login on your database from you app and remotely.

Créer une Cloud Function sur Google Cloud

Bonjour,


Si vous avez réalisé une application minimaliste, il se peut que vous n’ayez pas forcément besoin d’une machine pour faire tourner votre API. Dans ce cas, si vous avez besoin d’une route sans avoir à gérer l’identification par exemple, les Cloud Functions peuvent suffire. Ils se trouvent dans la section Calcul:

Créez votre fonction:

Nommez votre fonction, puisque c’est un GET depuis votre appli, je vous conseille de commence par l’appeler get, par exemple si on retourne la liste des voitures, ce sera “getVoiture”. Ce sera un déclencheur HTTP :

Je conseille d’exiger le protocole HTTPS pour des raisons évidentes de sécurité. Vous pouvez commenter la première ligne. Vous pouvez ensuite faire votre liste de voitures au format JSON.

Vous pouvez ensuite tester la fonction depuis l’onglet TEST ou alors en allant directement dans l’URL du déclencheur dans l’onglet DECLENCHEUR :

Vérifier l’authenticité d’un diplôme d’un candidat

Bonjour à tous,

Etant donné que nous sommes en “Vive la France, Vive la République” le pays de Molière et de Baudelaire, l’état nous a mis à disposition une magnifique plateforme de vérification des diplômes accessible depuis https://diplome.gouv.fr/ si vous voulez vérifier les premiers diplômes d’un candidat à savoir son baccalauréat ou quelques diplômes comme le BTS, vu que j’ai fait un BTS avant de me diriger vers une license puis un Master:

Ainsi, pas de doutes, Jean Michel est bien diplômé. Attention cependant à bien vérifier l’académie et l’année pour trouver vos diplômes, car si vous avez été dans plusieurs départements, ce ne sera sans doute pas la même académie. Par exemple, en région Ile-de-France, vous avez 3 académies: Créteil, Paris, Versailles. Me concernant j’ai dû aller chercher dans celles de Créteil puis celle de Paris.

Analyze the trading market with MarketWatcher

I am very happy to annonce you that I have finally published Market Watcher, a Metatrader 4 indicator that I’ve made and been using several years on different brokers. This indicator allows you to see in few seconds the most important characteristics of each pairs (FOREX, CFD, Index or Crypto) of a Metatrader 4 broker, such:

Spread ( How much you lose when you open an order )

Ticks to Zero ( How much ticks for the spread )

Tick Value ( The value of each tick/pips )

ATR ( Average True Range, to determine the volatility )

Lot Min-Max ( The minimum and maximum lots allowed to trade on the pair )

This is a good way to know easily and very fast if a broker is interesting, whatever if you are using a demo or real account on your broker.
You can see additionally the order, in GREEN the best values and the others in RED.
On the right side, there is a calculated list of the best pairs that you should trade.

MarketWatcher 1.4 on Metatrader 4

Do not hesitate to contact me if you have any question how to use it.

Solving errors of publishing an app on Google Play – Cordova / Ionic

INVALID APP VERSION :versionCode OR versionName

You should have a look on the following files:
platforms\android\AndroidManifest.xml
You will find the tag “android:versionCode” and ” android:versionName”.
config.xml
You will find the tag “android-versionCode” and ” version”.

Don’t forget to change this file and not only the AndroidManifest.xml because if you are using the Ionic Cordova command to build, this one:

ionic cordova build android --prod --release

It will takes the version from config.xml and should regenerate AndroidManifest.xml.

INVALID ANDROID SDK VERSION

• Open Android Studio
• Download the latest version of the Android SDK, by going File > Project Settings :

The latest API level is 30

• Set the latest API level on File > Project Structure :

CentOS : Fix ” HTTPS Error 404 – Not Found ” with YUM

If you want to install a package on CentOS with YUM is it possible that you might have the following error

Total download size: 20 M
Installed size: 60 M
Is this ok [y/d/N]: y
Downloading packages:
Delta RPMs disabled because /usr/bin/applydeltarpm not installed.
PACKAGE.x86 FAILED                                          
https://rpm.nodesource.com/pub_15.x/el/7/x86_64/PACKAGE.x86_64.rpm: [Errno 14] HTTPS Error 404 - Not Found
Trying other mirror.
To address this issue please refer to the below wiki article 

https://wiki.centos.org/yum-errors

If above article doesn't help to resolve this issue please use https://bugs.centos.org/.

Error downloading packages:
  2:PACKAGE.x86_64: [Errno 256] No more mirrors to try.

To solve this problem we should reset the sources used by YUM, the package manager of CentOS. To do so, you should use the following command:

yum clean all

It should clean the sources of the repos. You should now be able to install the packages you want with yum i <package>

Host multiple frontend React/Angular app on one NGINX server

Is it possible that you have multiple web applications React.JS or Angular and you want it to be on one unique machine

You will have to check your NGINX configuration file /etc/nginx/nginx.conf or /etc/nginx/conf.d/ssl.conf – on CentOS/Fedora/RedHat.

ON THE SAME DOMAIN

One app will run on domain.com and the other app will run on domain.com/app2 :

server {
    listen 443 http2 ssl;
    listen [::]:443 http2 ssl;

    server_name DOMAIN.COM;
    #ssl_certificate /etc/letsencrypt/live/DOMAIN.COM/fullchain.pem; # managed by Certbot
    #ssl_certificate_key /etc/letsencrypt/live/DOMAIN.COM/privkey.pem; # managed by Certbot
    ssl_dhparam /etc/ssl/certs/dhparam.pem;
    
    # FIRST WEB APP - runs on https://DOMAIN.COM
    root /usr/share/nginx/firstapp/build;
    index index.html index.htm;
    try_files $uri $uri/ /index.html;

    # SECOND WEB APP - runs on https://DOMAIN.COM/app2
    location /app2 {
      autoindex on;
      index index.html;

      alias /usr/share/nginx/app2/build/;

      try_files $uri $uri/ /index.html;
    }
}

ON DIFFENTS DOMAINS

One app will run on app1.domain.com and the other app will run on app2.domain.com :

server {
    listen 443 http2 ssl;
    listen [::]:443 http2 ssl;

    server_name app1.domain.com;
    #ssl_certificate /etc/letsencrypt/live/app1.domain.com/fullchain.pem; # managed by Certbot
    #ssl_certificate_key /etc/letsencrypt/live/app1.domain.com/privkey.pem; # managed by Certbot
    ssl_dhparam /etc/ssl/certs/dhparam.pem;

    root /usr/share/nginx/app1/build;
    index index.html index.htm;
    try_files $uri $uri/ /index.html;
}
server {
    listen 443 http2 ssl;
    listen [::]:443 http2 ssl;

    server_name app2.domain.com;
    ssl_certificate /etc/letsencrypt/live/app2.domain.com/fullchain.pem; # managed by Certbot
    ssl_certificate_key /etc/letsencrypt/live/app2.domain.com/privkey.pem; # managed by Certbot
    ssl_dhparam /etc/ssl/certs/dhparam.pem;

    root /usr/share/nginx/app2/build;
    index index.html index.htm;
    try_files $uri $uri/ /index.html;
}

403 Forbidden / 404 Not authorized

In case of error, you will have to check your logs:

sudo tail -n 20 /var/log/nginx/error.log