Month: February 2022

React native with Android – Fix : Device unauthorized

Check developer is enabled in the phone settings

One reason your phone is not detected is that you don’t have enabled the developer mode in the Android Settings.

Check the connected android devices with adb devices

Now you can check if your phone is connected with adb devices

sh-3.2# adb devices
* daemon not running; starting now at tcp:5037
* daemon started successfully
List of devices attached
CBAA004484J41536762     unauthorized

Authorise your device with adb kill-server and adb devices

If your phone still not asking anything while connected, you can force the adb service to restart like that:

sh-3.2# adb kill-server
sh-3.2# adb devices
* daemon not running; starting now at tcp:5037
* daemon started successfully

Then now you should be able to see a message on your phone asking if you authorise the computer.
Now you should be able to do your react-native run-android or yarn android

Start Google Cloud instance VM from a shared image from another Project / Organization

If you have multiple projects or organization and you want to clone a machine that is already configured, you can create an image of the instance of the machine.
But, you will have to share the access to the external project and organization.
Here is how to do it :

Share the image to the organization in the Images and in IAM

In both IAM and Image (VM) you will have to share the access Compute Image User

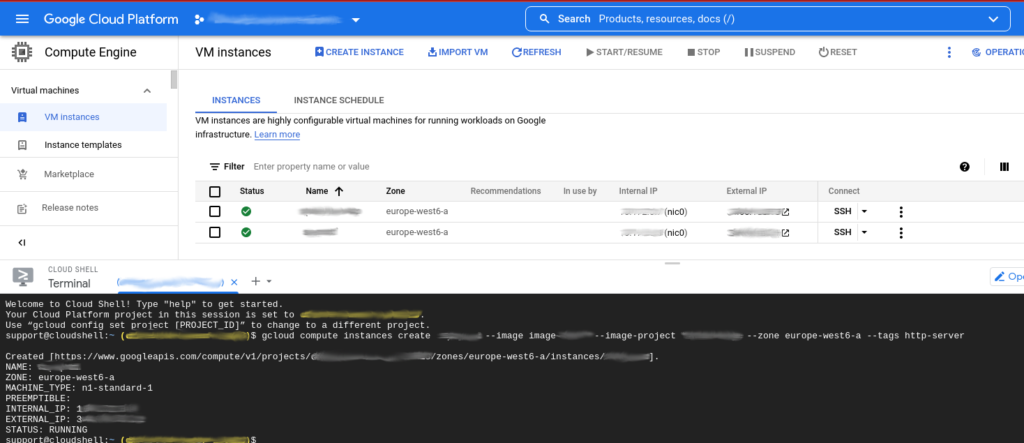
Start the VM using the shared image from another project / organization

gcloud compute instances create INSTANCE-NAME --image SHARED-IMAGE-NAME --image-project PROJECT-NAME --zone ZONE --tags http-server
  • INSTANCE-NAME : Name of the VM instance you are creating (that will appear in the VM list)
  • SHARED-IMAGE-NAME : The name of the image you shared to the organization
  • PROJECT-NAME : The name if the project where is the image you shared to the organization
  • ZONE : The geographical zone of the VM

Now the machine is started from an image from another organization and project !

Mac M1 : react native iOS mobile app on Simulator

I decided to make an article because I spent almost 5 days on this problem, and I don’t want it never happen. So let me help all the people that can be in the same case of me.

– You have a Mac M1 running on ARM 64 architecture
– You are working on a React Native or Swift project with Xcode

Exclude the ARM architecture in the Podfile

Add the following lines in the Podfile (/ios/Podfile) :

    post_install do |installer|
      ## FIX MAC M1 ARM
      react_native_post_install(installer)
      installer.pods_project.build_configurations.each do |config|
        config.build_settings["EXCLUDED_ARCHS[sdk=iphonesimulator*]"] = "arm64"
      end
    end

You should check that there is only one “post_install” in the file, if there is not you can add it at the end of the file, if there is already “post_install” somewhere, just put the instructions to exclude the architecture ARM 64 at the end of the “post_install” section.

Dependencies with CocoaPods

In the /ios folder of your React Native project, you should run the following command to build all the dependancy in the /Pods folder :

sudo arch -x86_64 pod install --allow-root

or, you can also use pod-install to be sure all is installed:

npx pod-install

In case of error: Delete /Pods folder, delete Podfile.lock and start again. In case of error of dependancies in node_modules, delete node_modules and run yarn.

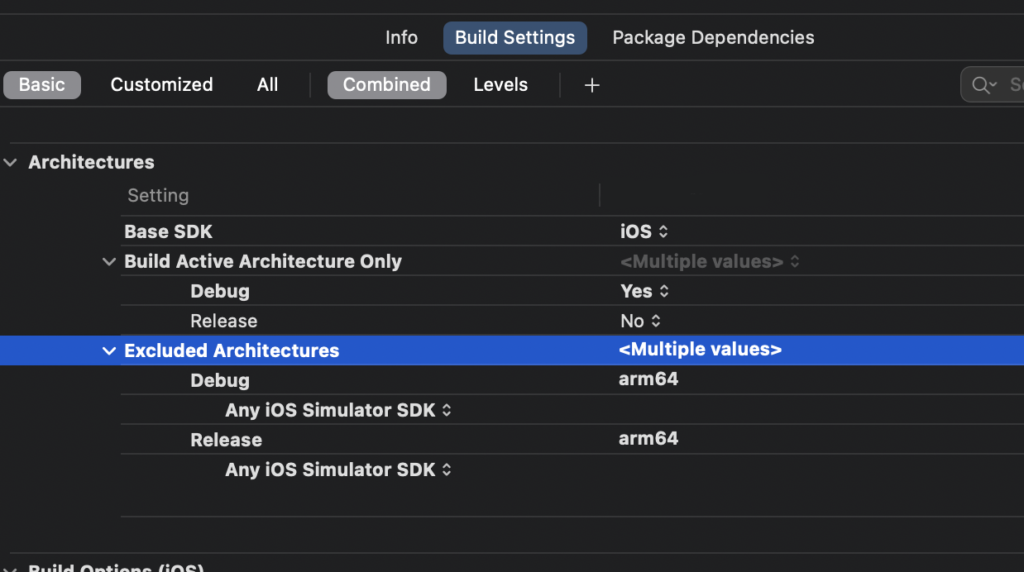
Exclude the ARM architecture in Xcode

Now, you should also exclude the architecture in the project settings in Xcode :

Exclude the architecture “arm64” in Project > Build Settings > Architectures

Then if you start the react native project on Simulator it should works !