Category: React Native

XCode not compiling for Mac Catalyst because of an SDK / xcframework
Is it possible that in your project you was coding for iOS and iPad but you also want your application to build on MacOS and you can do it easily with Catalyst that allows you to run an iOS app on MacOS.
For your information, you can enable it on Apple Store Connect so your app on TestFlight will be available on MacOS.
But, you can also add it in XCode, this is what we will do in this small tutorial :

You can add MacOS destination to your mobile project in “General” tab

The only problem is that sometimes some SDK and frameworks are not compatible with MacOS Catalyst, so you may have such errors if your try to build or launch the app on MacOS :

Method 1 : disable build of framework in “Build Phases” for Mac Catalyst
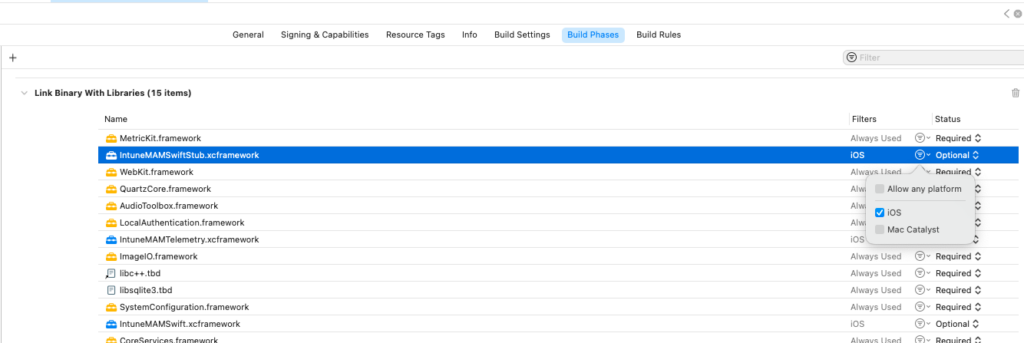
Go in the “Build Phases” tab of your app in the section “Link Binary With Libraries”

Disable the platform Mac Catalyst for the frameworks causing the error. You have to go in the tab “Build Phases” > Link Binary With Library, then look to the framework that you want to not build for Mac Catalyst, near the Status you can see the arrow icon, click on it and uncheck “Allow any platform” and “Mac Catalyst”.

Method 2 : use cocoapods catalyst support

To solve this problem you can try to have a look on the repository of cocoapods-catalyst-support :

Step 1 : install the package

$ gem install cocoapods-catalyst-support

Step 2 : init

$ pod catalyst init

Step 3 : set the config in /ios/Podfile

In the ios folder (if you are on a react native project), open the Podfile file and after the pod catalyst init you can see that there are additional lines:

catalyst_configuration do
	# Uncomment the next line for a verbose output
	# verbose!

	# ios '<pod_name>' # This dependency will only be available for iOS
	# macos '<pod_name>' # This dependency will only be available for macOS
end

Modify this part with the SDK / frameworks that are a problem during the build.

Step 4 : Apply the changes

Apply the changes for the next build on XCode with these commands

$ pod catalyst validate     # check if your new configuration is valid
$ pod catalyst run             # apply the changes if valid

Method 3 : Build Settings for each Pod

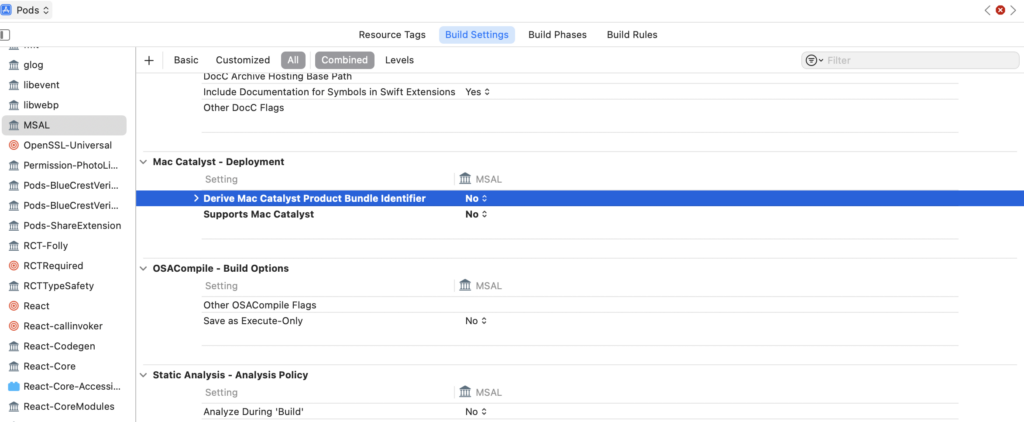
If you still have errors you can also look in the “Build Settings” of the concerned Pod and disable “Derive Mac Catalyst Product Bundle Identifier” and “Supports Mac Catalyst” :
Generate IPA file from XCode

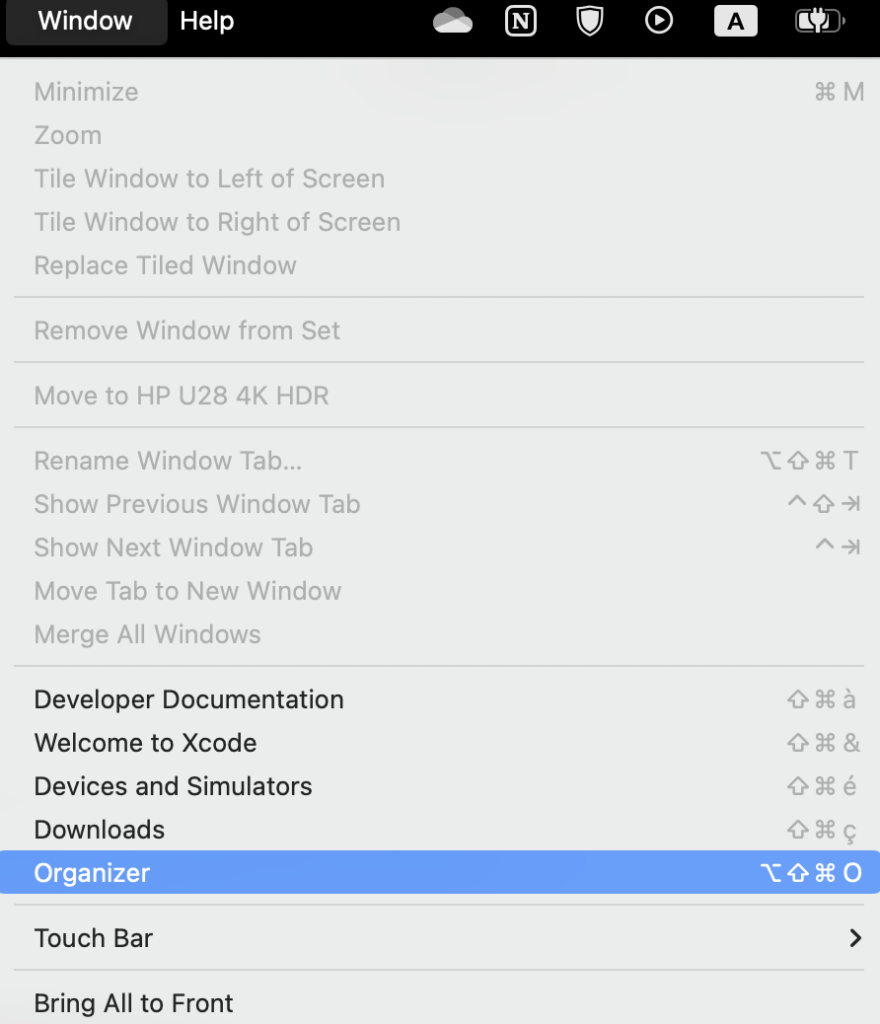
To generate a IPA file from XCode you need to archive your project, if you already did it before, you can open the organizer. If you never archived your project, you can go to Product > Archive and then it will open the Organizer when the compilation is complete.

Archive the project if you didn’t before
OR open the organizer if you already archived your project
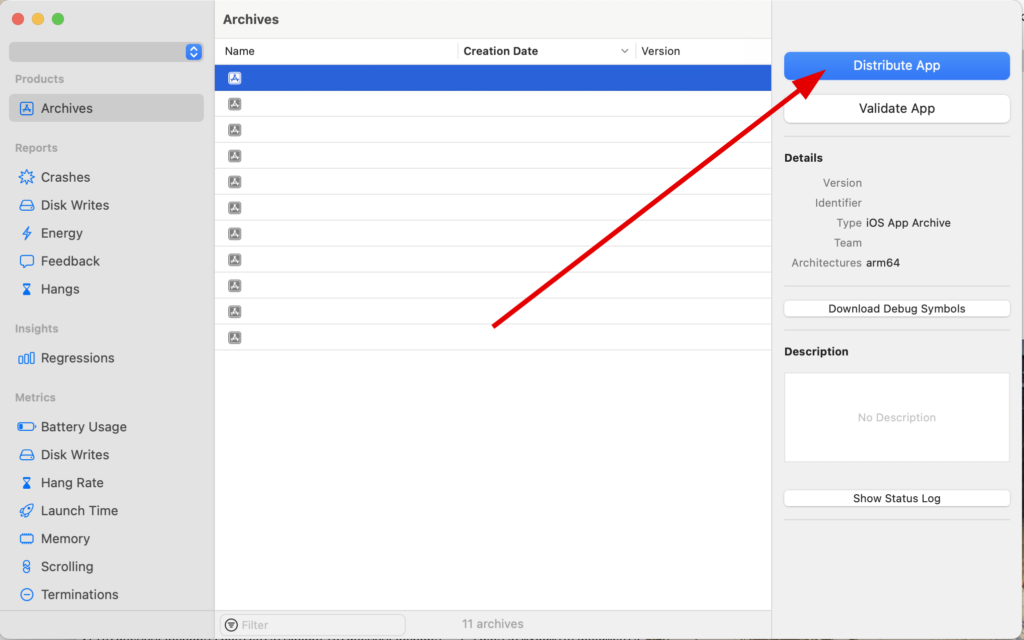
Click on Distribute App
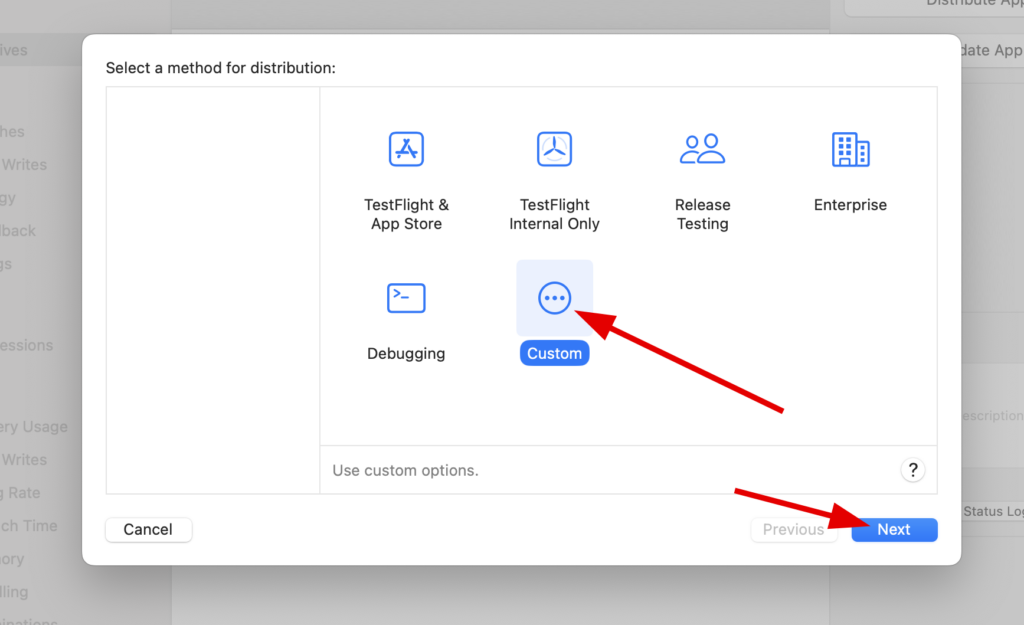
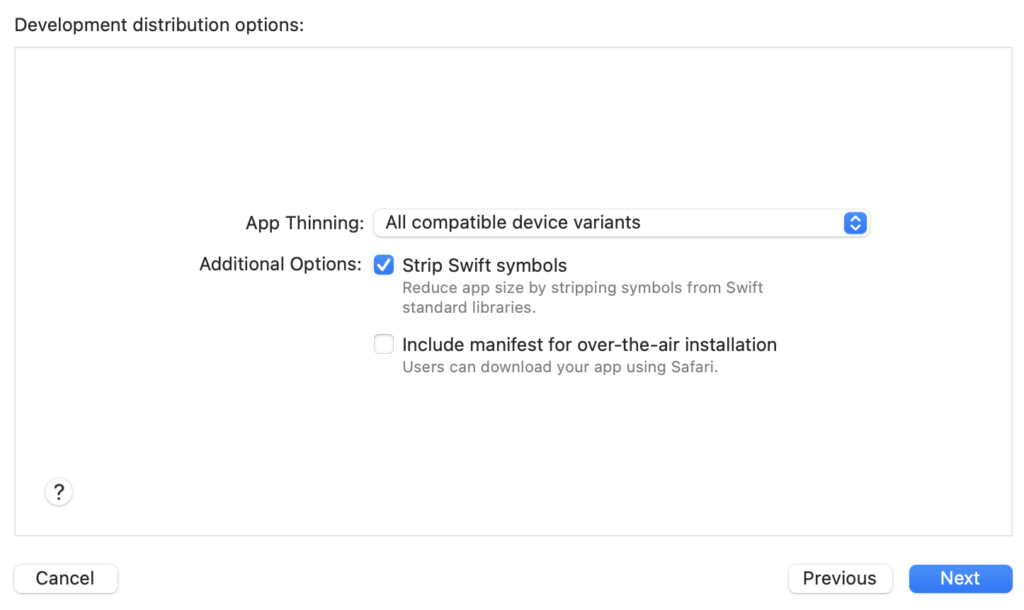
You can click on “Custom” and then “Next”
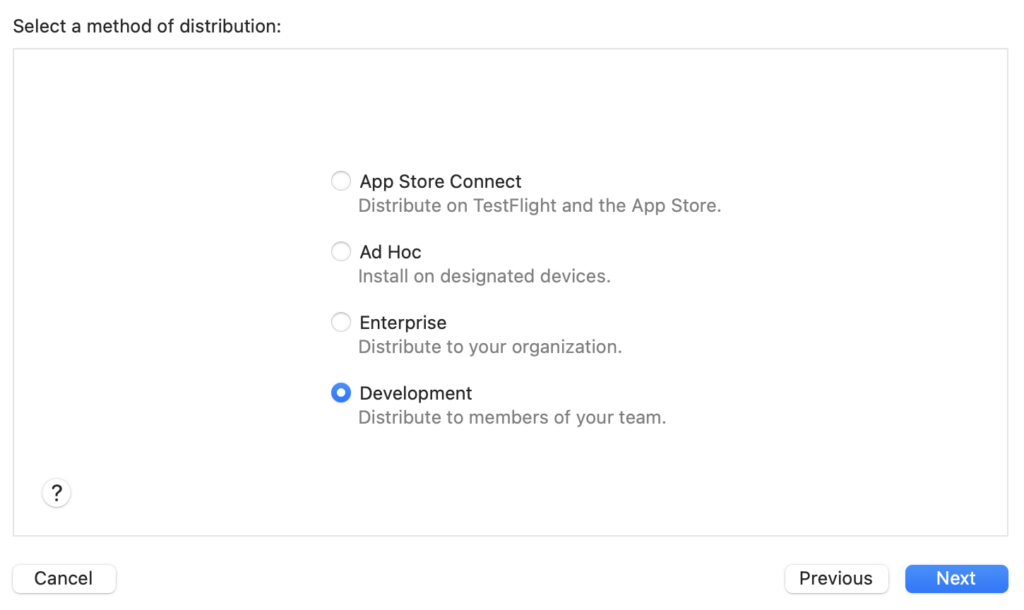
You should select “Development”
You can then select “All compatible device variants” in App Thinning
You can then select “Automatically manage signing”

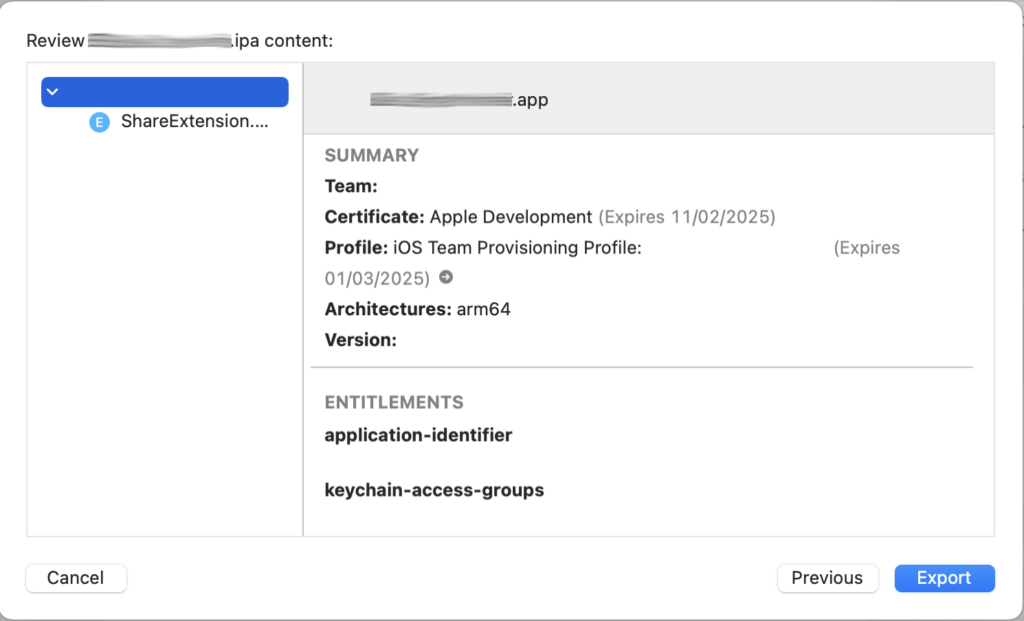
Then you should be able to go to the final step

Export the project to IPA file with Export (select the right folder)

Integrate Intune SDK to React Native project

This article is about my experience with integration of Intune SDK to a react native project as there is no official SDK provided by Microsoft for React Native.

Copy the SDK content in the /ios folder

Go to https://github.com/msintuneappsdk/ms-intune-app-sdk-ios and download all the repository. Extract the content in a folder named “IntuneMAM” and put it in the /ios folder, same level as your *.xcodeproj file.

Run the configurator

In the root of the Intune SDK file, you should have the IntuneMAMConfigurator file that will be configuring the plist and entitlements automatically :

% ./IntuneMAMConfigurator -i ../PROJECTNAME/Info.plist -e ../PROJECTNAME/PROJECTNAME.entitlements 
2024-02-29 13:16:45.787 IntuneMAMConfigurator[36231:7276997] Success!!!

This is possible that you have rights issues (permission denied), to solve it you can do the usual chmod :

chmod 777 IntuneMAMConfigurator

Then, based on your needed, read this documentation: https://learn.microsoft.com/en-us/mem/intune/developer/app-sdk-ios-phase3

Adding extra dependencies

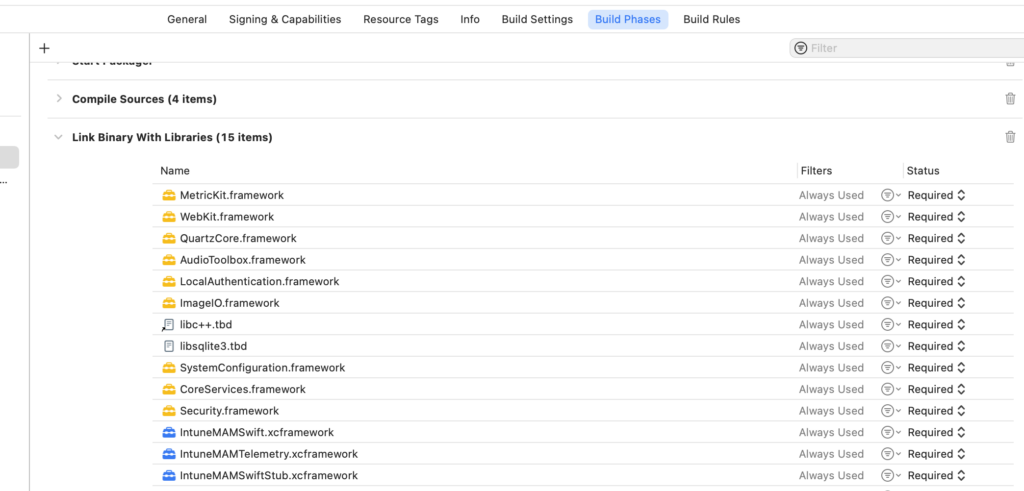
Add the following dependencies to be sure the SDK will work:

  • MessageUI.framework
  • Security.framework
  • CoreServices.framework
  • SystemConfiguration.framework
  • libsqlite3.tbd
  • libc++.tbd
  • ImageIO.framework
  • LocalAuthentication.framework
  • AudioToolbox.framework
  • QuartzCore.framework
  • WebKit.framework
  • MetricKit.framework
These libs should be added

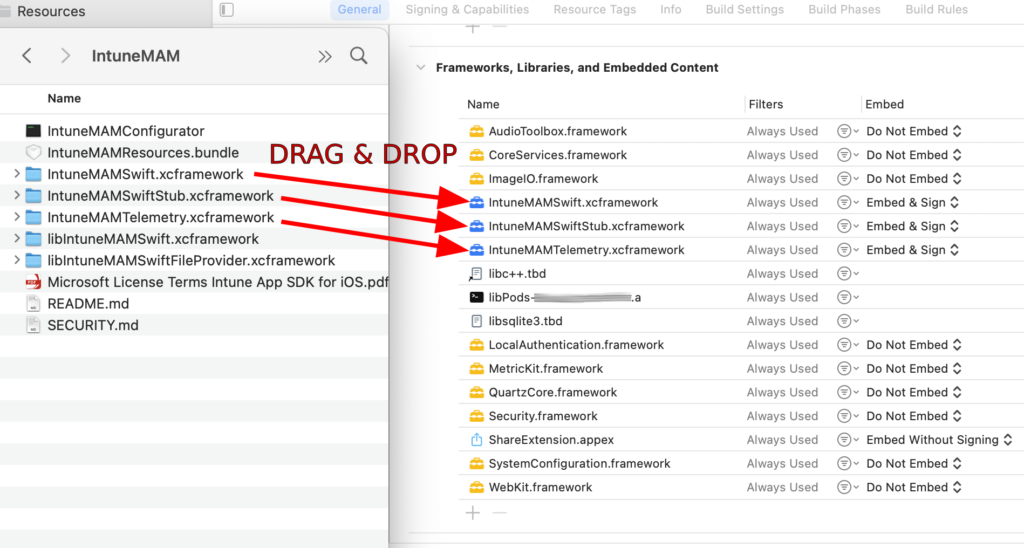
Drag & drop the .xcframework folders

Open XCode and drag & drop the xcframework folders to “Frameworks, Libraries and Embedded Content”

Drag & Drop these 3 xcframework folders that don’t start with “lib” (they are static frameworks)

Add the Keychain Group Intune MAM

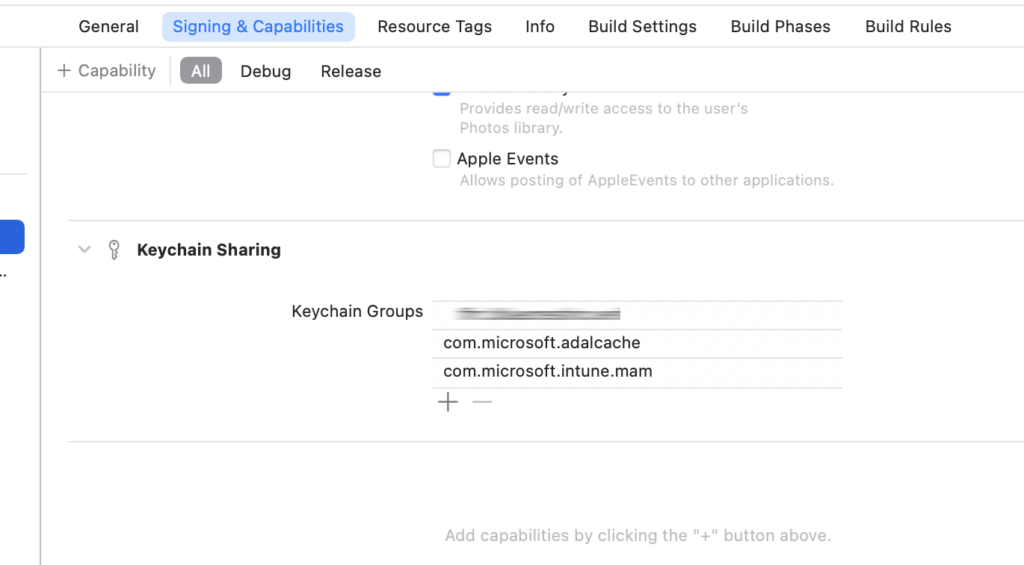
Then In Signing & Capabilities tab, go in Keychain Sharing section and add:

com.microsoft.intune.mam
Add the keychain group “com.microsoft.intune.mam”

You can notice that I also have added com.microsoft.adalcache that is related to MSAL (Microsoft Authentication Library).

Add headers to your AppDelegate.mm and AppDelegate.h

AppDelegate.h

#import <React/RCTBridgeDelegate.h>
#import <UIKit/UIKit.h>
#import <IntuneMAMSwift/IntuneMAM.h> // <--- Add it

@interface AppDelegate : UIResponder <UIApplicationDelegate, RCTBridgeDelegate, IntuneMAMComplianceDelegate> // <--- Add IntuneMAMComplianceDelegate

@property (nonatomic, strong) UIWindow *window;

@end

AppDelegate.mm

#import <MSAL/MSAL.h>
#import <IntuneMAMSwift/IntuneMAM.h>
#import <IntuneMAMSwift/IntuneMAMEnrollmentManager.h>
#import <IntuneMAMSwift/IntuneMAMComplianceManager.h>
#import <IntuneMAMSwift/IntuneMAMFileProtectionManager.h>
#import <IntuneMAMSwift/IntuneMAMDataProtectionManager.h>
#import <IntuneMAMSwift/IntuneMAMAppConfigManager.h>
...
// isEnrolledAccount : method to know if microsoft account is enrolled
RCT_EXPORT_METHOD(isEnrolledAccount:(RCTPromiseResolveBlock)resolve
                  rejecter:(RCTPromiseRejectBlock)reject)
{
    NSString *userIdentity = 'your_name@your_company.com';
    IntuneMAMEnrollmentManager *enrollmentManager = [IntuneMAMEnrollmentManager instance];
    
    BOOL isIntuneEnrolled = (enrollmentManager.enrolledAccount != nil);
    BOOL isMDMEnrolled = (enrollmentManager.mdmEnrolledAccount != nil);
    NSLog(@"Is Intune Enrolled: %@", isIntuneEnrolled ? @"YES" : @"NO");
    NSLog(@"Is MDM Enrolled: %@", isMDMEnrolled ? @"YES" : @"NO");

    if (isIntuneEnrolled) {
        resolve(@"Intune");
    } else if (isMDMEnrolled) {
        resolve(@"MDM");
    } else {
        resolve(@"None");
    }
}

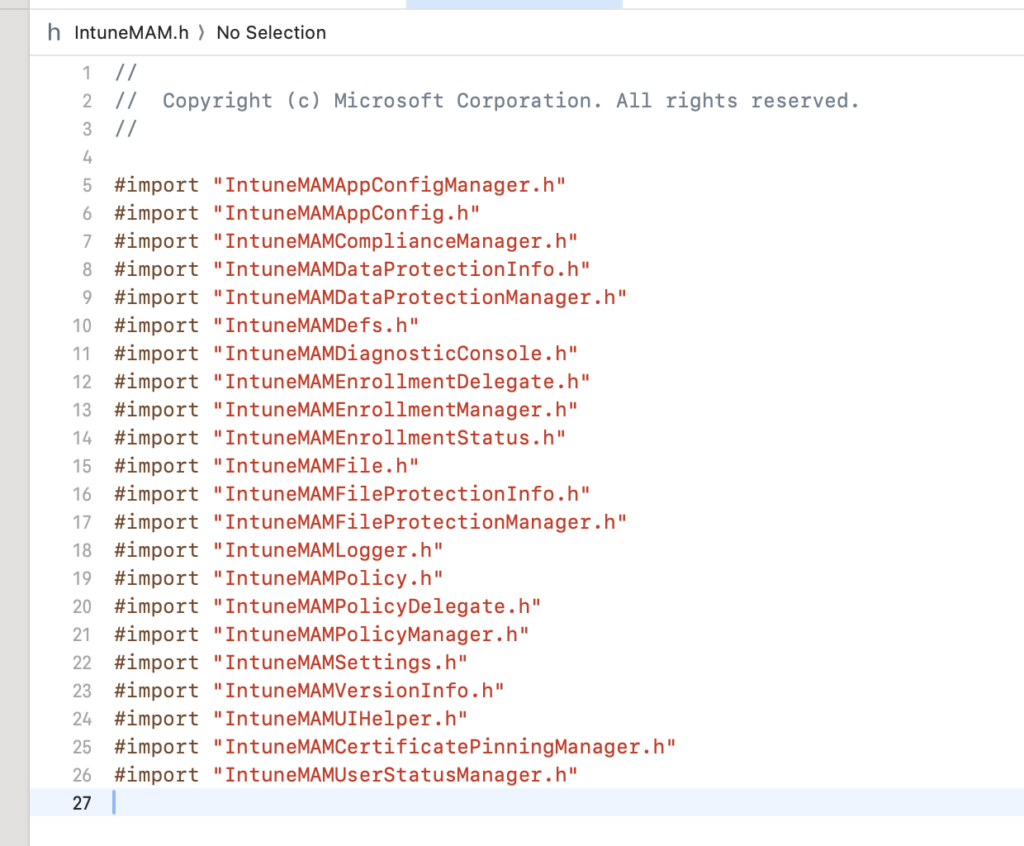
And you can have a look on the available functions for the library in the header files. Here are all the headers you can use in your code:

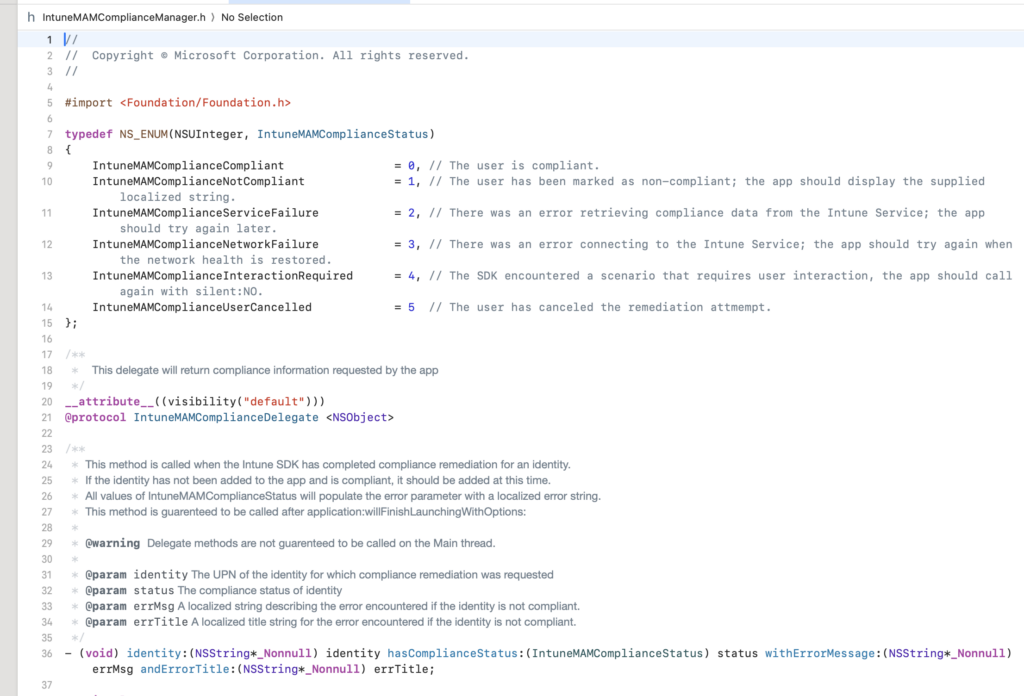
And if you go on each headers you can see that the documentation is very well explained for each API available, here is an example with IntuneMAMComplianceManager.h

Each functions have comments that explain how it works, you will have the read all depending of your needs

Hope that this article helps ! Don’t hesitate to rate & comment the article.

React Native : fix ‘React/RCTDefines.h’ file not found

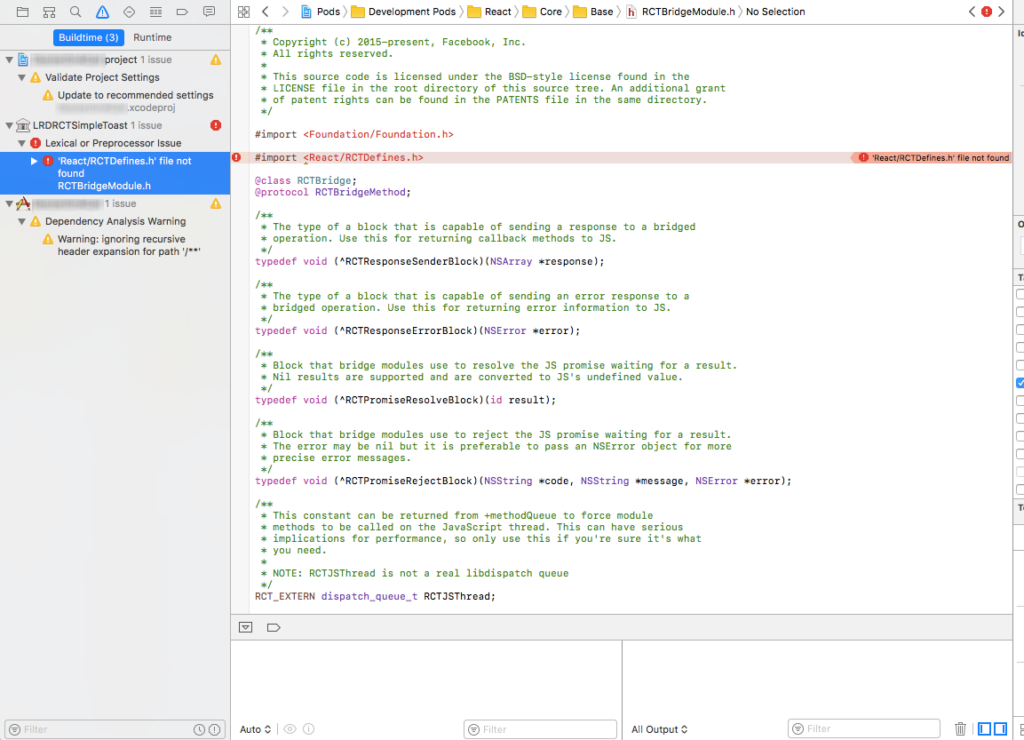
It is possible that after adding a new library in your React Native project (or after upgrading or adding some packages) you have the following error in XCode when you try to build:

<React/RCTDefines.h> file not found

or

'React/RCTDefines.h' file not found

This error means that the library is not correctly set up with your React Native project.
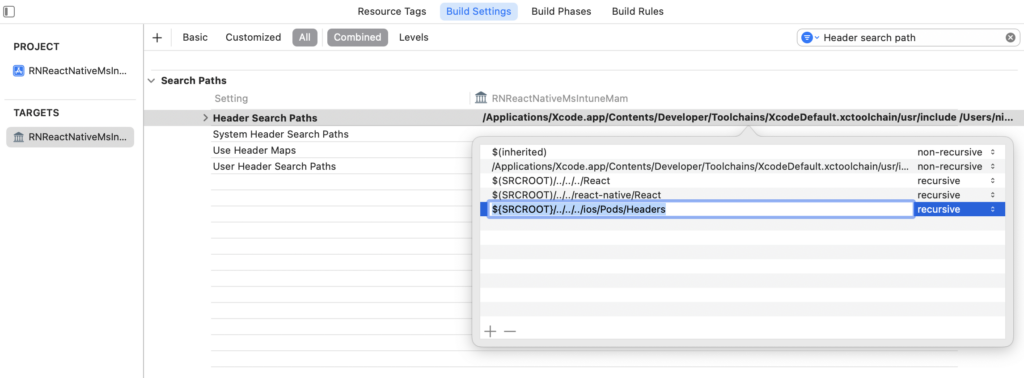
To fix this error, go to your library settings. You will have to modify the Header Search Path input in Build Settings :

Go to Libraries > YourLib.xcodeproj > Targets > Build Settings > Search “Header Search Path”

“Header Search Path” should be in the section “Search Paths”. I recommend to use the search input because there are a lot of fields.

In my case, the external library named “RNReactNativeMstuneMam.xcodeproj” was doing the problem, so I am opening the settings of the xcodeproj file of this project. It can be any other library with another name, but you will have to fix the xcodeproj file, following to the error path that you have.

Now, double click to Header Search Paths and add:

${SRCROOT}/../../../ios/Pods/Headers
Add the entry ${SRCROOT}/../../../ios/Pods/Headers by double clicking

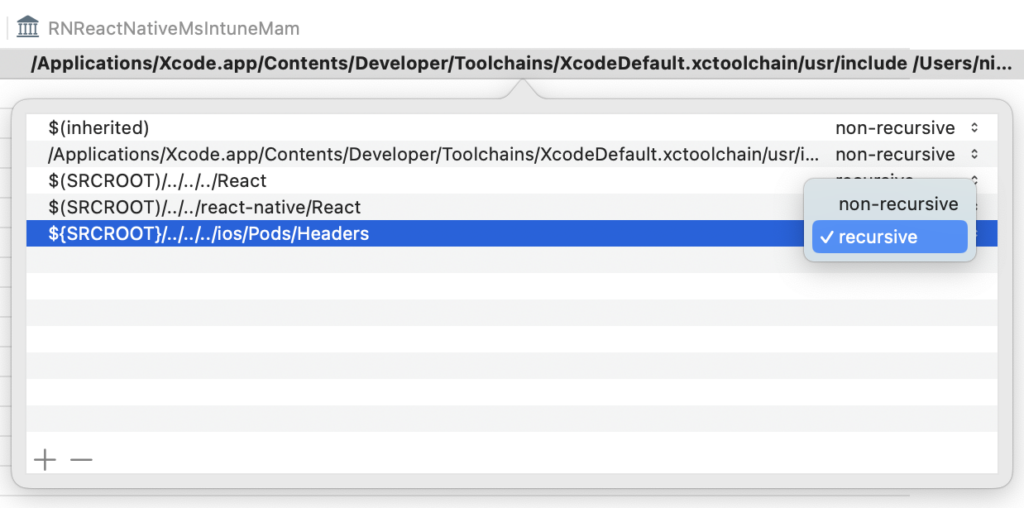
Set it to recursive:

set it to recursive

Now, you can clean and build again:

Clean project and build again

The error should not appear anymore as your library will find the Pods headers.

Git : Don’t commit node_modules except a file in a library

If you are using the node_modules in your Node.JS / Javascript / Typescript project you should exclude to commit all the libraries used by your application with this line in the .gitignore file:

.gitignore

node_modules/

But, you may need to modify a file in the /node_modules folder, excluded in the .gitignore

Force commit a file in a excluded folder in .gitignore

If you want to fix a file in a library that makes some problems in your application, you may want to modify the library directly in /node_modules (the case you are using the last version of the library, you can check on https://www.npmjs.com/ if you are using the last version in your package.json)

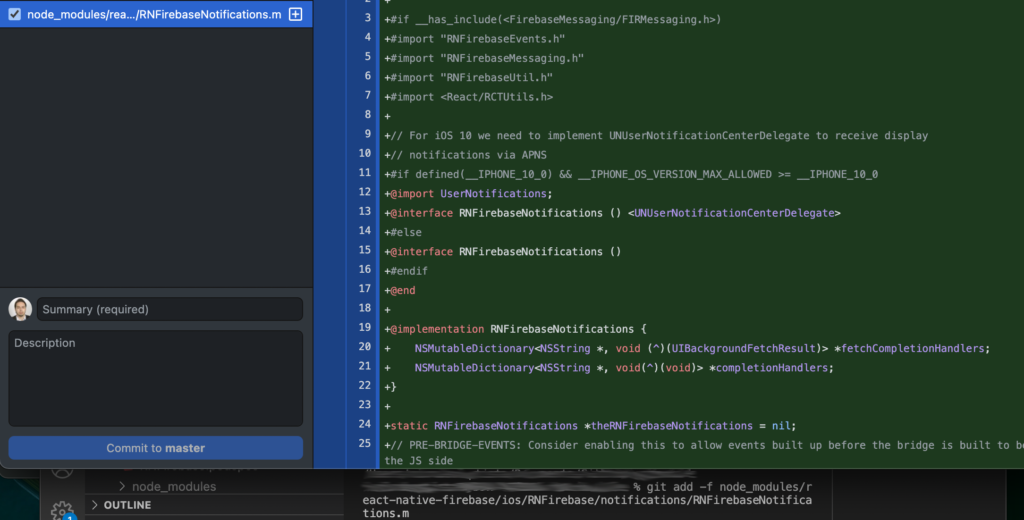
In my case, I modified node_modules/react-native-firebase/ios/RNFirebase/notifications/RNFirebaseNotifications.m a library that is not changed since 2 years and have a problem in my application. You can of course make a git issue on the official page but if you need it to work fast, you may want to commit it directly in your project and it is fixed.

After you made the change in the library, you can commit with git add -f …

In my case:

git add -f node_modules/react-native-firebase/ios/RNFirebase/notifications/RNFirebaseNotifications.m
You can see your file to be commit in your Git Desktop, and my node_modules folder is excluded in .gitignore

Mac M1 : react native iOS mobile app on Simulator

I decided to make an article because I spent almost 5 days on this problem, and I don’t want it never happen. So let me help all the people that can be in the same case of me.

– You have a Mac M1 running on ARM 64 architecture
– You are working on a React Native or Swift project with Xcode

Exclude the ARM architecture in the Podfile

Add the following lines in the Podfile (/ios/Podfile) :

    post_install do |installer|
      ## FIX MAC M1 ARM
      react_native_post_install(installer)
      installer.pods_project.build_configurations.each do |config|
        config.build_settings["EXCLUDED_ARCHS[sdk=iphonesimulator*]"] = "arm64"
      end
    end

You should check that there is only one “post_install” in the file, if there is not you can add it at the end of the file, if there is already “post_install” somewhere, just put the instructions to exclude the architecture ARM 64 at the end of the “post_install” section.

Dependencies with CocoaPods

In the /ios folder of your React Native project, you should run the following command to build all the dependancy in the /Pods folder :

sudo arch -x86_64 pod install --allow-root

or, you can also use pod-install to be sure all is installed:

npx pod-install

In case of error: Delete /Pods folder, delete Podfile.lock and start again. In case of error of dependancies in node_modules, delete node_modules and run yarn.

Exclude the ARM architecture in Xcode

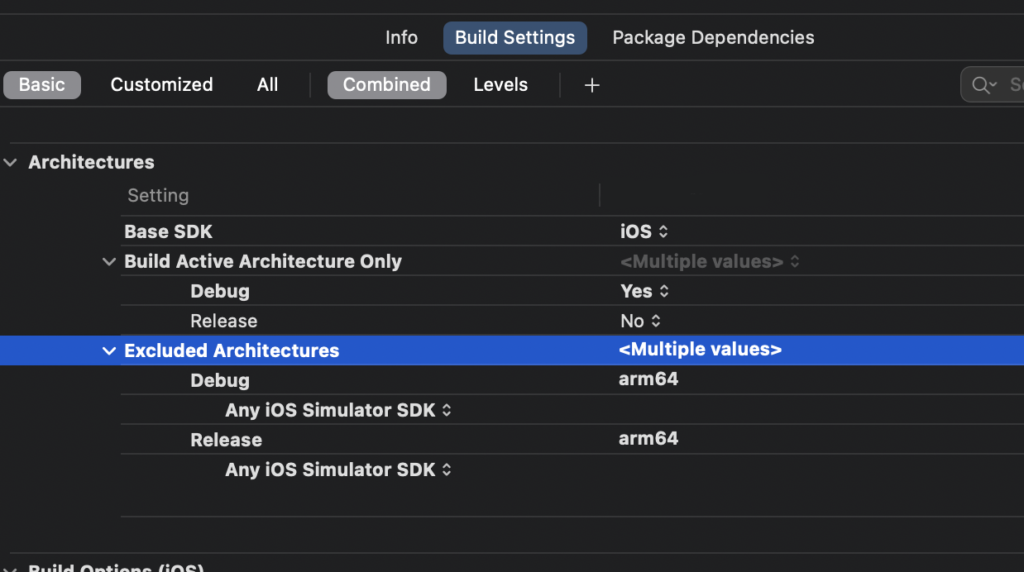
Now, you should also exclude the architecture in the project settings in Xcode :

Exclude the architecture “arm64” in Project > Build Settings > Architectures

Then if you start the react native project on Simulator it should works !

Public Images for your React / Angular app on Google Cloud

We often need images in our React or Angular app, but putting them in the project is not clean.
So we can use Google Cloud with Cloud Storage for the images on your app.

There are many advantages of using Cloud Storage to expose public images :
– Real time maintenance (upload, delete, change, …)
– You don’t need any commit on your git (if you commit images on your Github / Gitlab for example)
– Clean project, only code files
– Light project repository to commit, images are heavy quickly

Create a Bucket

First, you need to create a Bucket (it’s like a big folder) if you don’t already have one.

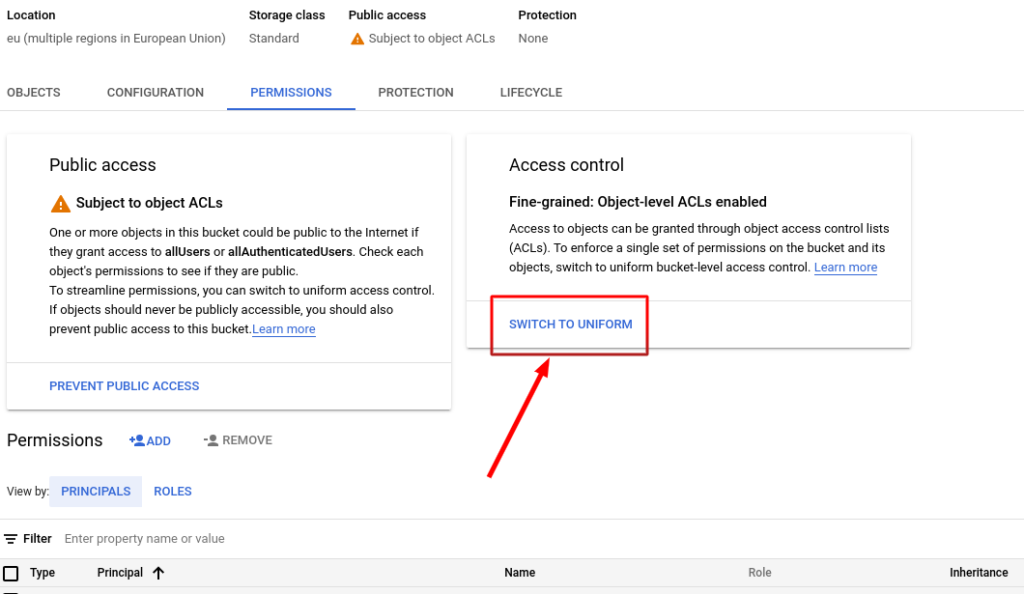
Switch to Uniform access control

Then, to make your Bucket public, go to the Permissions tab, and change the access control to Uniform :

You should click Switch to Uniform, so you don’t have to make public each file one by one
You can see, if you upload your first image, that it’s not public yet

Add public access using by adding a Reader role for allUsers

You can then add the access of Object Reader to allUsers
Then you can see it’s Public to Internet and you are able to copy URL

You can now use you image anywhere, it’s on internet and anyone can see it with the URL, so you can use it to store images for your React / Angular app, all images will work.

OnClick inside OnClick with React

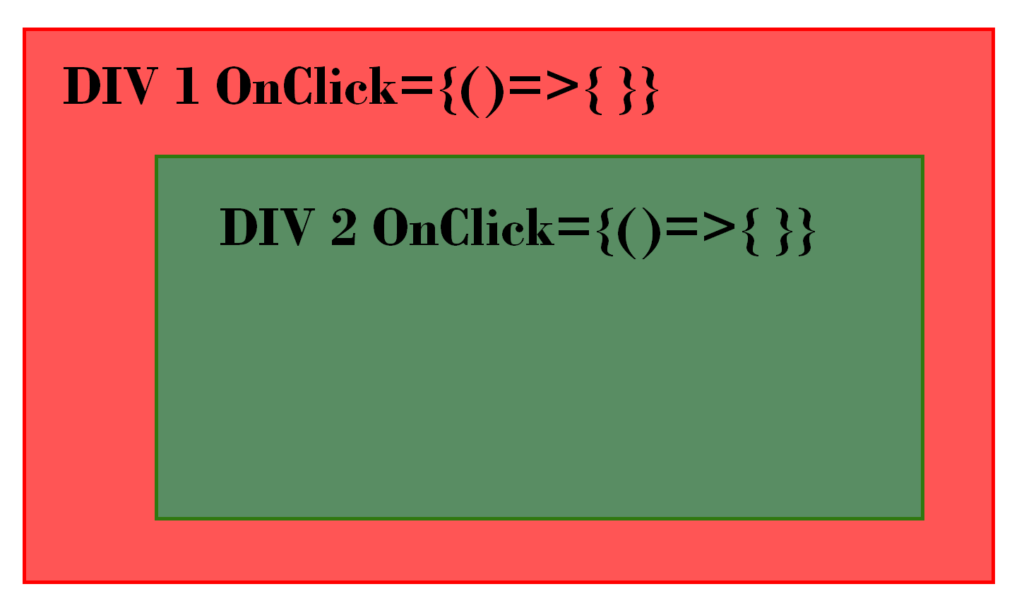
While doing some test after putting the event OnClick in a DIV inside another DIV with the Onclick event, I was not able to trigger the OnClick event that was inside the other.

<div id="div1" style={{background: 'red'}} onClick={() => { 
setClicked('div1');
}>
  DIV 1
  <div id="div2" style={{background: 'green'}} onClick={() => { 
  console.log('you clicked div2');
  setClicked('div2');
  }>
    DIV 2
  </div>
</div>
When we click on the DIV 2, it triggers the DIV 1 onClick event

If you click on the green div, and then, if you check the logs you see that the log is working, you triggered the event.
But, if you check your state, you will see that it’s div1, and not div2, but you clicked DIV 2.
Your click action has been propagate to the DIV 2.

How to solve the problem

In order to solve this problem, we will need a fix. So we can trigger both events.
The problem is that the click action is propagate to the the other div.
So, we need to check when you trigger the onClick action that the user clicked on the good one.
To do so, we can add the following instructions in the inner DIV:

if(event.target !== event.currentTarget) return;

Which will give:

<div id="div1" style={{background: 'red'}} onClick={(event) => { 
if(event.target !== event.currentTarget) return;
setClicked('div1');
}>
  DIV 1
  <div id="div2" style={{background: 'green'}} onClick={() => { 
  console.log('you clicked div2');
  setClicked('div2');
  }>
    DIV 2
  </div>
</div>

With buttons inside a DIV with 3 levels DIV

If you have 3 levels of DIV and you want only the action of the button of the div the be triggered then you can use the following instruction in the end of the OnClick:

<div id="div3" style={{background: 'yellow'}} onClick={(event)=>{
...
event.stopPropagation();
}}/>

stopPropagation will stop the click event and so the second OnClick event will not be triggered.

React.JS / React Native : Class VS Hooks

No matter if you are using React.JS or React Native, Javascript or Typescript, you can choose these 2 ways to manage the states.

Using Class OR using Hooks : What are the differences ?

Class

import React, { Component } from 'react'; 

[...]

class Button extends Component {
    constructor(props){
        super(props);

        this.state = {
            touched: false,
            selected: false,
        }
    }

  toggleTouched = () => {
    this.setState({
      touched: true
    });
  } 
    
    render(){ 
        return( 
            <button id="button" onMouseOver={this.toggleTouched} >
                click me!!
            </button>
        );
    } 
}

export default Button;

Using a class, you need to create a class that extends from a React Component. Like every class in every languages, you use the constructor to init the class. We use it to set the default values to our states. Moreover, we need to use “this” in that class to know that we are getting the values or the function in this class, this refer to the context.


Hooks

import React, { memo, useState, useEffect } from 'react'; 

[...]

const Button = memo((props) => {
  const [touched, setTouched] = useState(false);
  const [selected, setSelected] = useState(false); 
 
  const toggleTouched = () => {
    setTouched(true);
  } 

  return( 
     <button id="button" onMouseOver={toggleTouched} >
        click me!!
     </button>
  );
}); 

export default Button;

Same component, working the same too, but we need a bit less code.
We don’t need a constructor, to set the default value to our states, we just use the parameter of useState.
We don’t need the “this” keyword too, because we don’t are in a class anymore.

Instead of using setState, we use useState.
When it starts if “use…”, we are talking about hooks :
– useState : set a state with the name, the setter, the initial value
– useEffect : refresh if specific state is changed, we can use it as “ComponentWillMount” if we don’t give a state in 2nd param
– useRef : Reference for JSX
– useCallback, …etc.

Hooks seems to be the new best way to manage our states and you should use it as it may save a lot of times and lines in your code.

Create a dynamic list from JSON • React Native / React.JS

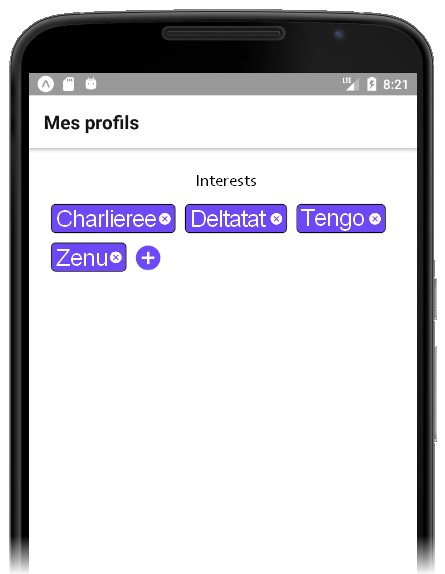
How can we create a dynamic list of objects like Views or Texts, dynamically, in a loop in React Native or React.JS from a JSON response from a REST API ?

The objective is to create a dynamic interface with buttons for adding and removing elements like that :

First, we will use the data variable to store a JSON reponse (later you can change it with the API response with a fetch() function), it will contains 3 elements.

[
        {
            "id": "01",
            "name": "Charlie",
        },
        {
            "id": "02",
            "name": "Tango",
        },
        {
            "id": "03",
            "name": "Delta",
        }
] 

Then, we will create the json variable to store the parsed JSON from the data variable. It means, the data variable is only a text string and the json variable is a JSON object, so we can do json[0].id for example.

We can put the json variable as a state so if the JSON changes, the UI with refresh automaticaly.

Here is what it should look likes in your code, in the constructor of your class :

export default class DynamicList extends React.Component {
  constructor(props) {
    super(props);

    let data = `
    [
        {
            "id": "01",
            "name": "Charlie",
        },
        {
            "id": "02",
            "name": "Tango",
        },
        {
            "id": "03",
            "name": "Delta",
        }
    ]`;

    let json = JSON.parse(data);
    console.log('json ', json);

    this.state = {
      list: json,
    };
  } 

[...]

Now, to display a list from the state list (it will be this.state.list), we will use the map() function in render(), before the return, to create as many objects that we have elements in the list array.
In your map() function, you will have 2 parameters : data and i. You will have to put the i, the incremental variable, as a “key” in each object you will return as a new element – here, it’s <TouchableOpacity> :

render() {
    // HERE WE MAKE OUR LIST OF OBJECTS
    const soldierList = this.state.contracts.map((data, i) => {
      return (
        <TouchableOpacity
          key={i}
        >
          <View
            style={{
              flexDirection: 'row',
              justifyContent: 'flex-start',
              paddingTop: 5,
              paddingBottom: 5,
            }}
          >
              <Text style={{ fontFamily: 'Gotham-Medium', color: '#8DA8C7' }}>
                {dateShort(data.datestart)}
              </Text>
            </View>
            <View style={{ flexDirection: 'row', right: 0, position: 'absolute', bottom: 5 }}>
              <MaterialCommunityIcons
                name="cross"
                style={{ color: '#0261D2', lineHeight: 20 }}
              />
            </View>
          </View>
        </TouchableOpacity>
      );
    });

    // NOW WE CAN DISPLAY IT, IF THE LIST IS EMPTY WE GOT THE EMPTY LIST MESSAGE
    return (
      <ScrollView style={{ backgroundColor: '#f6f6f6', height: '100%', width: '100%' }}>
        {this.state.list.length < 1 && (
          <View style={{ alignItems: 'center' }}>
            <Text style={{ fontWeight: 'bold', color: '#0361d2', fontFamily: 'Gotham-Medium' }}>
              Empty list !!!
            </Text>
          </View>
        )}
        {this.state.list.length >= 1 && <View>{soldierList}</View>}
      </ScrollView>
    );
  }  

UPDATE (SOLUTION 2)

We can optimize it by testing directly the length of the array, making less code in the return :

render() {
     // HERE WE MAKE OUR LIST OF OBJECTS
     const soldierList = this.state.contracts.length ? this.state.contracts.map((data, i) => {
      return (
        <TouchableOpacity
          key={i}
        >
          <View
            style={{
              flexDirection: 'row',
              justifyContent: 'flex-start',
              paddingTop: 5,
              paddingBottom: 5,
            }}
          >
              <Text style={{ fontFamily: 'Gotham-Medium', color: '#8DA8C7' }}>
                {dateShort(data.datestart)}
              </Text>
            </View>
            <View style={{ flexDirection: 'row', right: 0, position: 'absolute', bottom: 5 }}>
              <MaterialCommunityIcons
                name="cross"
                style={{ color: '#0261D2', lineHeight: 20 }}
              />
            </View>
          </View>
        </TouchableOpacity>
      );
    }) : (
      <View style={{ alignItems: 'center' }}>
        <Text style={{ fontWeight: 'bold', color: '#0361d2', fontFamily: 'Gotham-Medium' }}>
          Empty list !!!
        </Text>
      </View> 
    );
 
    // NOW WE CAN DISPLAY IT, IF THE LIST IS EMPTY WE GOT THE EMPTY LIST MESSAGE
    return (
      <ScrollView style={{ backgroundColor: '#f6f6f6', height: '100%', width: '100%' }}>
        {soldierList}
      </ScrollView>
    ); 
 }