Category: REST API

Using ReactQuery with React instead of Axios + hooks

In your React app you can use ReactQuery and ReactQueries for request caching, background updates and stale data out of the box with zero-configuration, instead of just Axios + hooks.

UseQuery : 1 api request

import { useQuery } from '@tanstack/react-query';
import axios from 'axios';
...
const getServices = () => {
        return axios.get('https://jsonplaceholder.typicode.com/posts');
};
...
const { data, isError, isLoading } = useQuery(['services'], getServices);

if (isLoading) {
    return <p>Loading...</p>;
}

if (isError) {
    console.error('error');
}

return <ServiceComponent data={data} />;

UseQueries : 2+ api request

Index.tsx

import { useQueries } from '@tanstack/react-query';
import axios from 'axios';
...
const getServiceOne = () => {
        return axios.get('https://jsonplaceholder.typicode.com/posts');
};
...
const results: any = useQueries({
    queries: [
      { queryKey: ['serviceOne'], queryFn: getServiceOne, staleTime: Infinity },
      { queryKey: ['serviceTwo'], queryFn: getServiceTwo, staleTime: Infinity },
    ],
});

const serviceOneResult = results[0];
const serviceTwoResult = results[1];

  const isError = serviceOneResult.error || serviceTwoResult.error;
  const isLoading = serviceOneResult.isLoading || serviceTwoResult.isLoading;

  if (isLoading) {
    return <p>Loading...</p>;
  }

  if (isError) {
    console.error('error');
  }

  return (
    <ServiceComponent
      dataOne={serviceOneResult.data}
      dataTwo={serviceTwoResult.data}
    />
  );

Public Images for your React / Angular app on Google Cloud

We often need images in our React or Angular app, but putting them in the project is not clean.
So we can use Google Cloud with Cloud Storage for the images on your app.

There are many advantages of using Cloud Storage to expose public images :
– Real time maintenance (upload, delete, change, …)
– You don’t need any commit on your git (if you commit images on your Github / Gitlab for example)
– Clean project, only code files
– Light project repository to commit, images are heavy quickly

Create a Bucket

First, you need to create a Bucket (it’s like a big folder) if you don’t already have one.

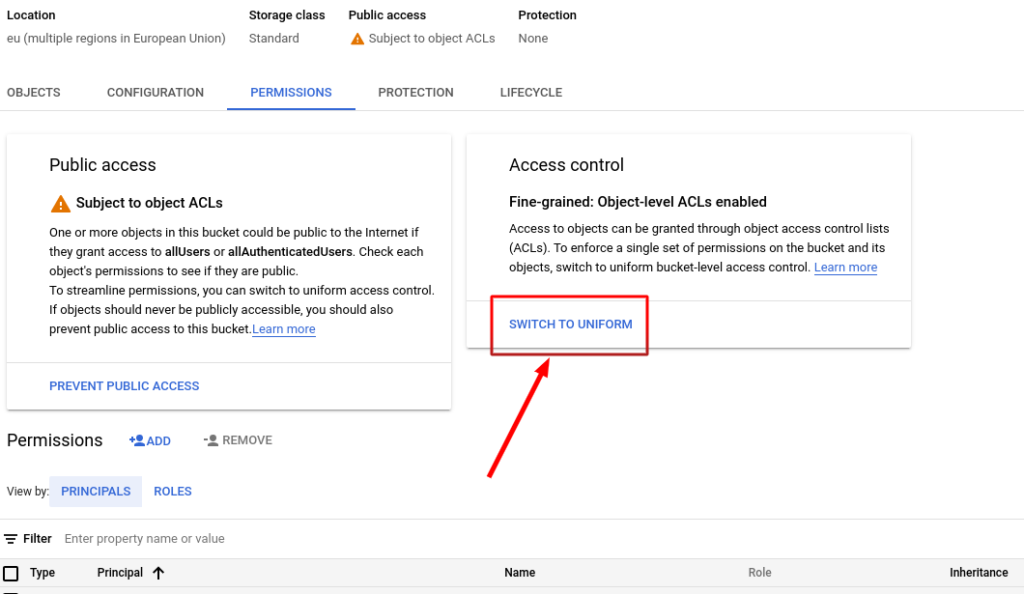
Switch to Uniform access control

Then, to make your Bucket public, go to the Permissions tab, and change the access control to Uniform :

You should click Switch to Uniform, so you don’t have to make public each file one by one
You can see, if you upload your first image, that it’s not public yet

Add public access using by adding a Reader role for allUsers

You can then add the access of Object Reader to allUsers
Then you can see it’s Public to Internet and you are able to copy URL

You can now use you image anywhere, it’s on internet and anyone can see it with the URL, so you can use it to store images for your React / Angular app, all images will work.

Sort your result by distance – Node.JS

Supposed that you return in your Node.JS backend a list of items, and you want to sort the results by distance.

For exemple, you do a GET /usersLocation and you have it:

[
   {
      name: "Paul",
      gender: "man",
      distance: 4.1
   },
   {
      name: "Philip",
      gender: "man",
      distance: 4.9
   },
   {
      name: "Elina",
      gender: "woman",
      distance: 2.5
   }
]

In your app you have the result to be listed by distance for exemple, so the user can know who is nearest first, and don’t have to scroll down to see that Elina is nearest. To do so, we can add this portion of code before returning the list of items:

    // items : variable containing all the items

    // SORT
    for(let a=items.length;a>0;a--)
    {
       for(let b=0;b<a-1;b++)
       {
          if(items[b].distance>items[b+1].distance) // we order by distance
          {
             // we swap the items
             tmp = items[b];
             items[b]=items[b+1];
             items[b+1]=tmp;
          }
       }
    }

    // returning the response for AWS Lambda
    const response = {
        statusCode: 200,
        body: JSON.stringify(items),
    };
    return response;
};

New response:

[
   {
      name: "Elina",
      gender: "woman",
      distance: 2.5
   },
   {
      name: "Paul",
      gender: "man",
      distance: 4.1
   },
   {
      name: "Philip",
      gender: "man",
      distance: 4.9
   }
]

Create quickly API with AWS – Lambda/API Gateway

Amazon Web Services — Wikipédia

This article is dedicated to new users to AWS – Amazon Web Services – that wants to use this cloud instead for others (Azure, Google Cloud) which seems to be the best choice at the moment. Indeed, AWS is the most complete scalable and dynamic cloud solution.

However, this is not so simple to understand all the concepts, if you look for simplicity you may be interested by Google Cloud that I used before.

In order to use API Gateway and Lamdba, you should add them in favorite in the Services:

Create your API functions in AWS Lambda

We can use AWS Lamdba to create routes that can be used for our applications.

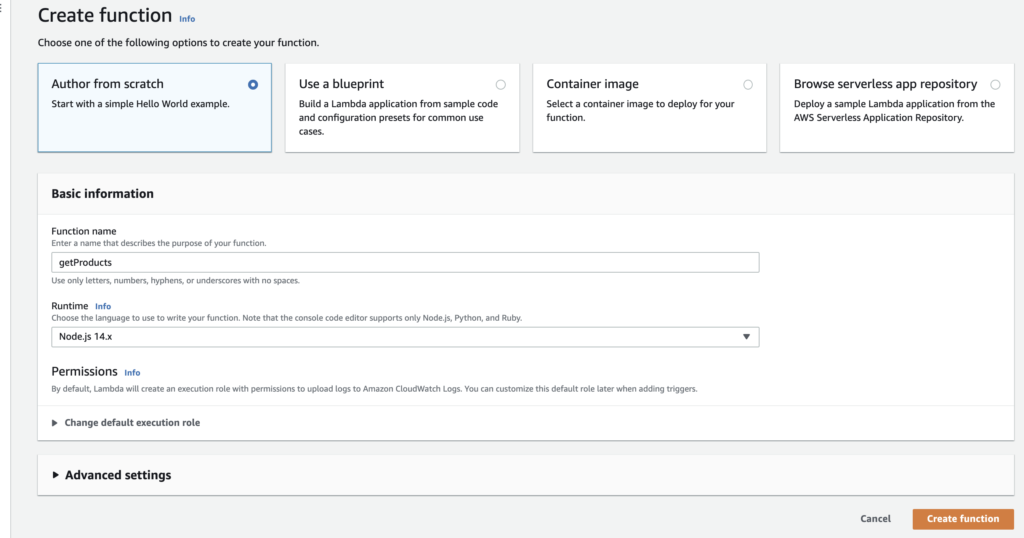
So, you can click Create function, in order to see the form bellow.
Let’s say we want to create a route to list the products of our app, it will be a GET method and we will call it getProducts.
We will use Node.JS because I have to habit to use Javascript and Typescript but you can choose the runtime you are in ease.

Then you can click Create function, we don’t need the others settings.

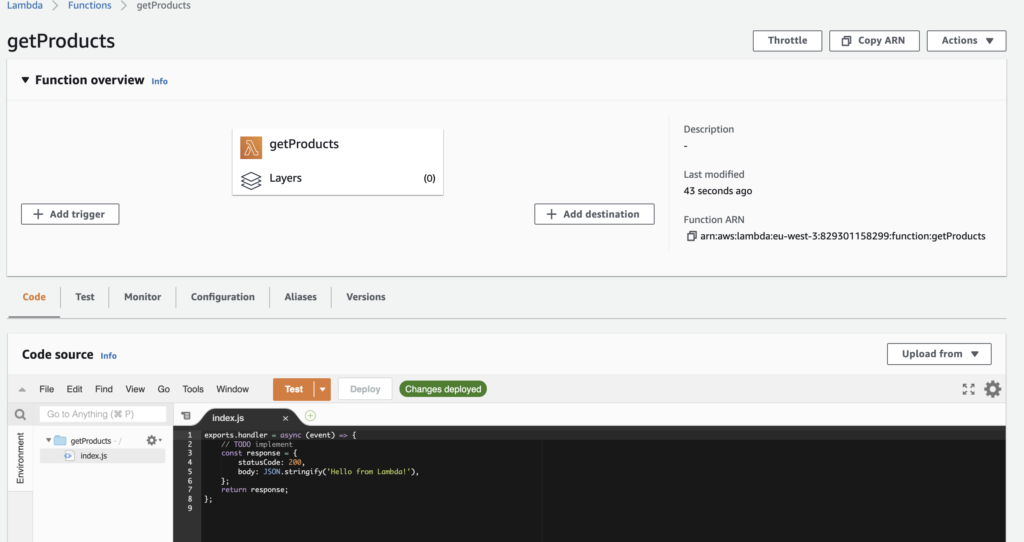
You should be now able to see the function overview with the default example in the code editor:

You can try the example it will show the string “Hello from Lambda”, the response that is returned in the example.
We can now write our own function from scratch here or alternatively we can upload our code from a ZIP file.

Create our API Gateway route (HTTP)

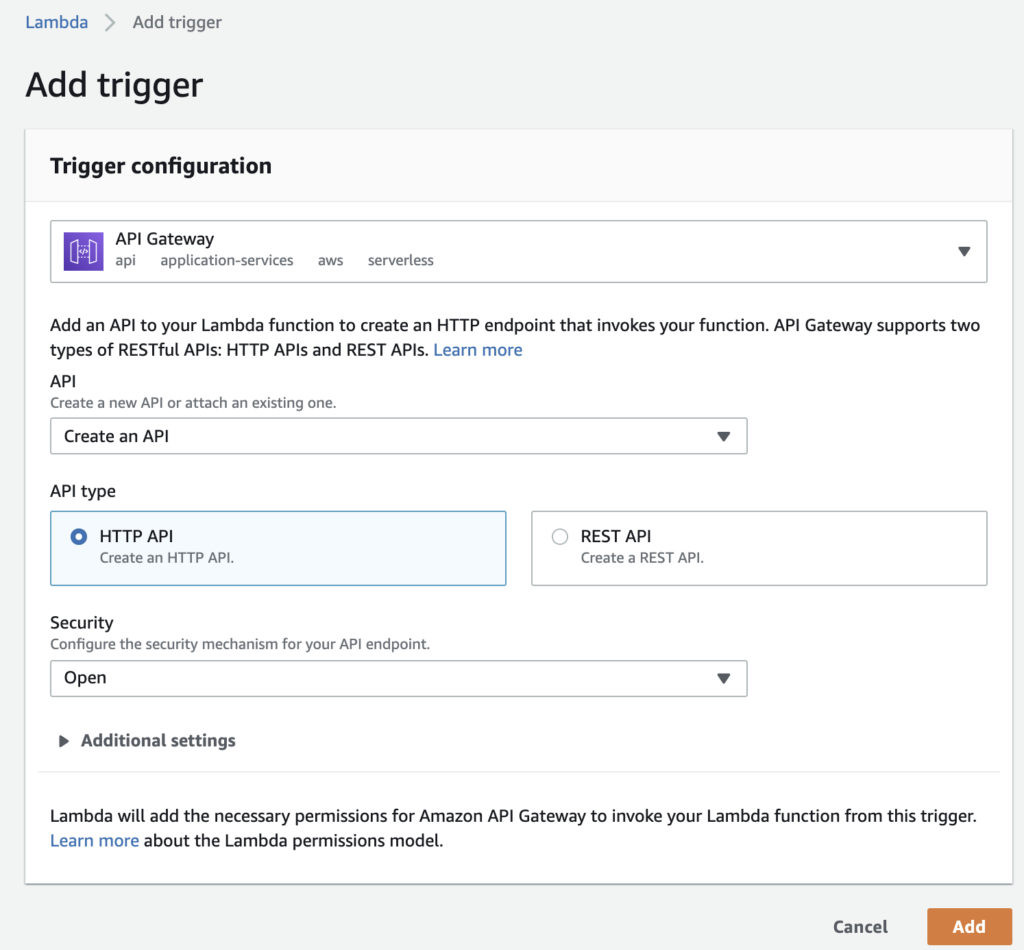
In the overview of the Lambda function you can see the button Add trigger, you can use it to add the API event that will call our function.

Click “Add trigger”
Select “Create API”, then “HTTP API” (best for cost) and “Open” the endpoint so your app can use it

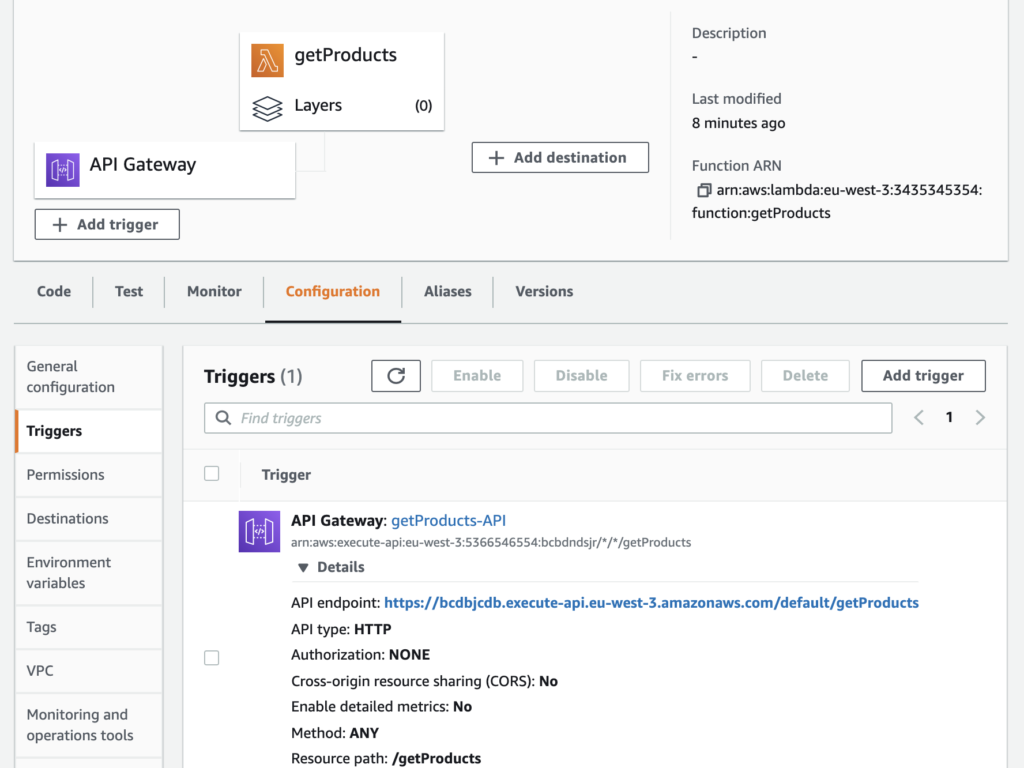
You can then click Save and so you should see your new trigger, the API Gateway trigger:

Now you can try it by going on the API endpoint link in the details.
You can use it like it in your application or you can change it by adding your own domain, for exemple api.myapp.com/getProducts
You can do that in Custom Domain Names or directly in your domain provider, in the DNS configuration, making a redirection.

Creating an API Gateway (REST API)

You could also, if you need it, use multiple methods such GET, POST, UPDATE, DELETE, … if you created a REST API Gateway :

You can then use your Lambda function for each methods you want to use.

Create a dynamic list from JSON • React Native / React.JS

How can we create a dynamic list of objects like Views or Texts, dynamically, in a loop in React Native or React.JS from a JSON response from a REST API ?

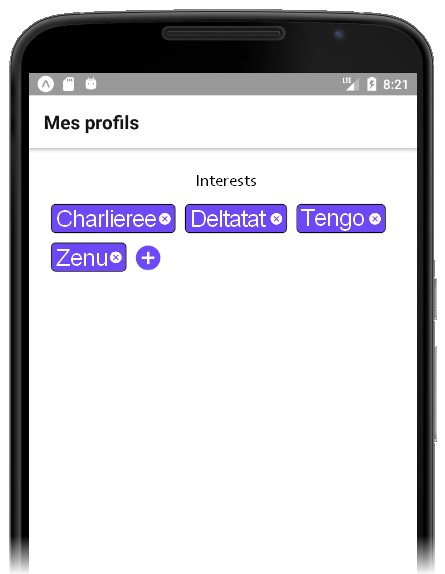
The objective is to create a dynamic interface with buttons for adding and removing elements like that :

First, we will use the data variable to store a JSON reponse (later you can change it with the API response with a fetch() function), it will contains 3 elements.

[
        {
            "id": "01",
            "name": "Charlie",
        },
        {
            "id": "02",
            "name": "Tango",
        },
        {
            "id": "03",
            "name": "Delta",
        }
] 

Then, we will create the json variable to store the parsed JSON from the data variable. It means, the data variable is only a text string and the json variable is a JSON object, so we can do json[0].id for example.

We can put the json variable as a state so if the JSON changes, the UI with refresh automaticaly.

Here is what it should look likes in your code, in the constructor of your class :

export default class DynamicList extends React.Component {
  constructor(props) {
    super(props);

    let data = `
    [
        {
            "id": "01",
            "name": "Charlie",
        },
        {
            "id": "02",
            "name": "Tango",
        },
        {
            "id": "03",
            "name": "Delta",
        }
    ]`;

    let json = JSON.parse(data);
    console.log('json ', json);

    this.state = {
      list: json,
    };
  } 

[...]

Now, to display a list from the state list (it will be this.state.list), we will use the map() function in render(), before the return, to create as many objects that we have elements in the list array.
In your map() function, you will have 2 parameters : data and i. You will have to put the i, the incremental variable, as a “key” in each object you will return as a new element – here, it’s <TouchableOpacity> :

render() {
    // HERE WE MAKE OUR LIST OF OBJECTS
    const soldierList = this.state.contracts.map((data, i) => {
      return (
        <TouchableOpacity
          key={i}
        >
          <View
            style={{
              flexDirection: 'row',
              justifyContent: 'flex-start',
              paddingTop: 5,
              paddingBottom: 5,
            }}
          >
              <Text style={{ fontFamily: 'Gotham-Medium', color: '#8DA8C7' }}>
                {dateShort(data.datestart)}
              </Text>
            </View>
            <View style={{ flexDirection: 'row', right: 0, position: 'absolute', bottom: 5 }}>
              <MaterialCommunityIcons
                name="cross"
                style={{ color: '#0261D2', lineHeight: 20 }}
              />
            </View>
          </View>
        </TouchableOpacity>
      );
    });

    // NOW WE CAN DISPLAY IT, IF THE LIST IS EMPTY WE GOT THE EMPTY LIST MESSAGE
    return (
      <ScrollView style={{ backgroundColor: '#f6f6f6', height: '100%', width: '100%' }}>
        {this.state.list.length < 1 && (
          <View style={{ alignItems: 'center' }}>
            <Text style={{ fontWeight: 'bold', color: '#0361d2', fontFamily: 'Gotham-Medium' }}>
              Empty list !!!
            </Text>
          </View>
        )}
        {this.state.list.length >= 1 && <View>{soldierList}</View>}
      </ScrollView>
    );
  }  

UPDATE (SOLUTION 2)

We can optimize it by testing directly the length of the array, making less code in the return :

render() {
     // HERE WE MAKE OUR LIST OF OBJECTS
     const soldierList = this.state.contracts.length ? this.state.contracts.map((data, i) => {
      return (
        <TouchableOpacity
          key={i}
        >
          <View
            style={{
              flexDirection: 'row',
              justifyContent: 'flex-start',
              paddingTop: 5,
              paddingBottom: 5,
            }}
          >
              <Text style={{ fontFamily: 'Gotham-Medium', color: '#8DA8C7' }}>
                {dateShort(data.datestart)}
              </Text>
            </View>
            <View style={{ flexDirection: 'row', right: 0, position: 'absolute', bottom: 5 }}>
              <MaterialCommunityIcons
                name="cross"
                style={{ color: '#0261D2', lineHeight: 20 }}
              />
            </View>
          </View>
        </TouchableOpacity>
      );
    }) : (
      <View style={{ alignItems: 'center' }}>
        <Text style={{ fontWeight: 'bold', color: '#0361d2', fontFamily: 'Gotham-Medium' }}>
          Empty list !!!
        </Text>
      </View> 
    );
 
    // NOW WE CAN DISPLAY IT, IF THE LIST IS EMPTY WE GOT THE EMPTY LIST MESSAGE
    return (
      <ScrollView style={{ backgroundColor: '#f6f6f6', height: '100%', width: '100%' }}>
        {soldierList}
      </ScrollView>
    ); 
 }