Category: Server Maintenance

Install MariaDB on a Fedora/CentOS/RedHat server

If you have your own server, the first thing you may want to do with your backend shoud be to install a database server on it.

Here is step by step how to install a MySQL/MariaDB (almost the same) database on your server:
Install the MariaDB service:

yum install mariadb mariadb-server

Create your user access – change the username and password you want:

mysql
CREATE USER username@'%' IDENTIFIED BY 'password';
GRANT ALL PRIVILEGES ON *.* TO 'username'@'%' ;
flush privileges;

Verify the user has been created:

SELECT User FROM mysql.user;

You should be able to login on your database from you app and remotely.
CentOS : Fix ” HTTPS Error 404 – Not Found ” with YUM

If you want to install a package on CentOS with YUM is it possible that you might have the following error

Total download size: 20 M
Installed size: 60 M
Is this ok [y/d/N]: y
Downloading packages:
Delta RPMs disabled because /usr/bin/applydeltarpm not installed.
PACKAGE.x86 FAILED                                          
https://rpm.nodesource.com/pub_15.x/el/7/x86_64/PACKAGE.x86_64.rpm: [Errno 14] HTTPS Error 404 - Not Found
Trying other mirror.
To address this issue please refer to the below wiki article 

https://wiki.centos.org/yum-errors

If above article doesn't help to resolve this issue please use https://bugs.centos.org/.

Error downloading packages:
  2:PACKAGE.x86_64: [Errno 256] No more mirrors to try.

To solve this problem we should reset the sources used by YUM, the package manager of CentOS. To do so, you should use the following command:

yum clean all

It should clean the sources of the repos. You should now be able to install the packages you want with yum i <package>

Host multiple frontend React/Angular app on one NGINX server

Is it possible that you have multiple web applications React.JS or Angular and you want it to be on one unique machine

You will have to check your NGINX configuration file /etc/nginx/nginx.conf or /etc/nginx/conf.d/ssl.conf – on CentOS/Fedora/RedHat.

ON THE SAME DOMAIN

One app will run on domain.com and the other app will run on domain.com/app2 :

server {
    listen 443 http2 ssl;
    listen [::]:443 http2 ssl;

    server_name DOMAIN.COM;
    #ssl_certificate /etc/letsencrypt/live/DOMAIN.COM/fullchain.pem; # managed by Certbot
    #ssl_certificate_key /etc/letsencrypt/live/DOMAIN.COM/privkey.pem; # managed by Certbot
    ssl_dhparam /etc/ssl/certs/dhparam.pem;
    
    # FIRST WEB APP - runs on https://DOMAIN.COM
    root /usr/share/nginx/firstapp/build;
    index index.html index.htm;
    try_files $uri $uri/ /index.html;

    # SECOND WEB APP - runs on https://DOMAIN.COM/app2
    location /app2 {
      autoindex on;
      index index.html;

      alias /usr/share/nginx/app2/build/;

      try_files $uri $uri/ /index.html;
    }
}

ON DIFFENTS DOMAINS

One app will run on app1.domain.com and the other app will run on app2.domain.com :

server {
    listen 443 http2 ssl;
    listen [::]:443 http2 ssl;

    server_name app1.domain.com;
    #ssl_certificate /etc/letsencrypt/live/app1.domain.com/fullchain.pem; # managed by Certbot
    #ssl_certificate_key /etc/letsencrypt/live/app1.domain.com/privkey.pem; # managed by Certbot
    ssl_dhparam /etc/ssl/certs/dhparam.pem;

    root /usr/share/nginx/app1/build;
    index index.html index.htm;
    try_files $uri $uri/ /index.html;
}
server {
    listen 443 http2 ssl;
    listen [::]:443 http2 ssl;

    server_name app2.domain.com;
    ssl_certificate /etc/letsencrypt/live/app2.domain.com/fullchain.pem; # managed by Certbot
    ssl_certificate_key /etc/letsencrypt/live/app2.domain.com/privkey.pem; # managed by Certbot
    ssl_dhparam /etc/ssl/certs/dhparam.pem;

    root /usr/share/nginx/app2/build;
    index index.html index.htm;
    try_files $uri $uri/ /index.html;
}

403 Forbidden / 404 Not authorized

In case of error, you will have to check your logs:

sudo tail -n 20 /var/log/nginx/error.log

Google Cloud SQL : SUPER privilege error while importing

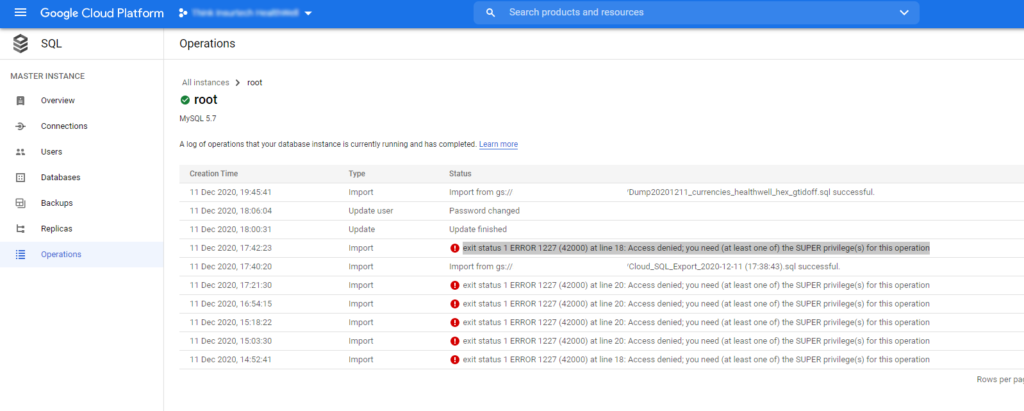
When importing SQL file on Google Cloud (MySQL 5.7), I faced the following error:

exit status 1 ERROR 1227 (42000) at line 18: Access denied; you need (at least one of) the SUPER privilege(s) for this operation  

You can see the error when go in “Operation”, you can see the logs of the MySQL instance

In order to solve this problem, you should understand that we do not have SUPER privileges on the Google Cloud SQL instance, it means if you do “SHOW GRANTS” on your MySQL, it will tell you that you have almost all the rights but not all.

This problem happen when you try to import some specific things such triggers, views, … so you should be careful on the SQL export when you do it.
As for me, I’m using MySQL Workbench 8.0, it seems that by default I have this error when I try to import the SQL file generated on Google Cloud.
I tried to import an export from Google Cloud to another instance and seems to work, so the problem is when you export the SQL file it should not contains things that needs specific privileges.
I found a configuration that worked for me and now I don’t have this annoying error anymore. Great !
Here is the options I have used. First, when you export, go to Advanced Options…


Then you should check the following options:

Now you can try to import the SQL file on Google Cloud, it should works ! F*ck yeah!

Commandes GIT sur serveur en production

Les commandes suivantes peuvent être utilisé sur un serveur en production.
Dans le cas d’un déveleppement sur machine locale, utiliser des logiciels gratuits comme GIT DESKTOP / SourceTree.

Voici les deux commandes utilisés au quotidien:

Premier déploiement dans un dossier

git clone <URL GITLAB/GITHUB HTTPS>

Mise à jour / Récupération des derniers changements

git pull

Les commandes suivantes répondent à des problematiques particulières qui peuvent arriver.

Changement de l’URL du repository GIT

Ce problème peut intervenir notamment si vous utilisez GITLAB ou GITHUB en SSH et que vous voulez passer en HTTPS ou vis versa, ou suite à des problèmes de droits d’une clé SSH type “remote: The project you were looking for could not be found.” et “fatal: Could not read from remote repository.”

Vérification de l’URL du repository:

git remote -v

Changement de cet URL:

git remote set-url origin <URL>

Changement de branche

git checkout <nom_de_la_branche>

Le git pull ne fonctionne pas “You have unstaged changes”

Il se peut que vous ayez l’erreur suivante, indiquant que des fichiers ont changés et doivent être commit alors que vous n’avez rien touché et que vous souhaitez juste mettre le serveur à jour :

Cannot pull with rebase: You have unstaged changes. 
Please commit or stash them. 

Dans ce cas, on doit supprimer ces changements avec la commande suivante :

git reset --hard

Vous pouvez ensuite faire votre git pull

Revenir au commit précédent

git reset --hard HEAD^

Revenir à un commit précis

git reset --hard <ID COMMIT>

L’ID du commit est générallement à 7 chiffres et lettres hexadecimal, exemple:
26b47fa

Vous pouvez le trouver dans l’onglet historique de votre GIT DESKTOP

Ecraser les modifications sur le repository distant (local > remote)

git push --force origin master

Attention, écrase le répository distant, utile si vous voulez “supprimer” un commit qui a été pushé.

Ecraser les modifications sur le repository local (remote > local)

git reset --hard origin/master

Attention, supprime toutes les modifications faites non pushé vers le git distant, utile si vous voulez “supprimer” les commits en local pour avoir la même chose que sur le git distant.

MongoDB on RedHat/CentOS/Fedora

INSTALLATION OF CENTOS

Add the additionnal following repo to get the mongoDB package not included by default:

  • nano /etc/yum.repos.d/mongodb-org-4.2.repo
[mongodb-org-4.2]
name=MongoDB Repository
baseurl=https://repo.mongodb.org/yum/redhat/$releasever/mongodb-org/4.2/x86_64/
gpgcheck=1
enabled=1
gpgkey=https://www.mongodb.org/static/pgp/server-4.2.asc
  • yum install -y mongodb-org

ADDING ADMIN USER

  • mongo
  • use admin
db.createUser({
       user: "username",
       pwd: "password",
       roles: [ "root" ]
   }
)

TESTING

  • mongo -u username -p password

ACCESS MONGODB FROM INTERNET

  • sudo nano /etc/mongod.conf

Change 127.0.0.1 (localhost) to 0.0.0.0 (all IP):

#bindIp: 127.0.0.1 
bindIp: 0.0.0.0

Restart the mongod service using this command:

  • sudo service mongod restart

USING A MONGODB TOOL GUI

You can use several tools to access and manage your mongoDB database. I recommend using the following tools: