Tag: react

React Native : fix ‘React/RCTDefines.h’ file not found

It is possible that after adding a new library in your React Native project (or after upgrading or adding some packages) you have the following error in XCode when you try to build:

<React/RCTDefines.h> file not found

or

'React/RCTDefines.h' file not found
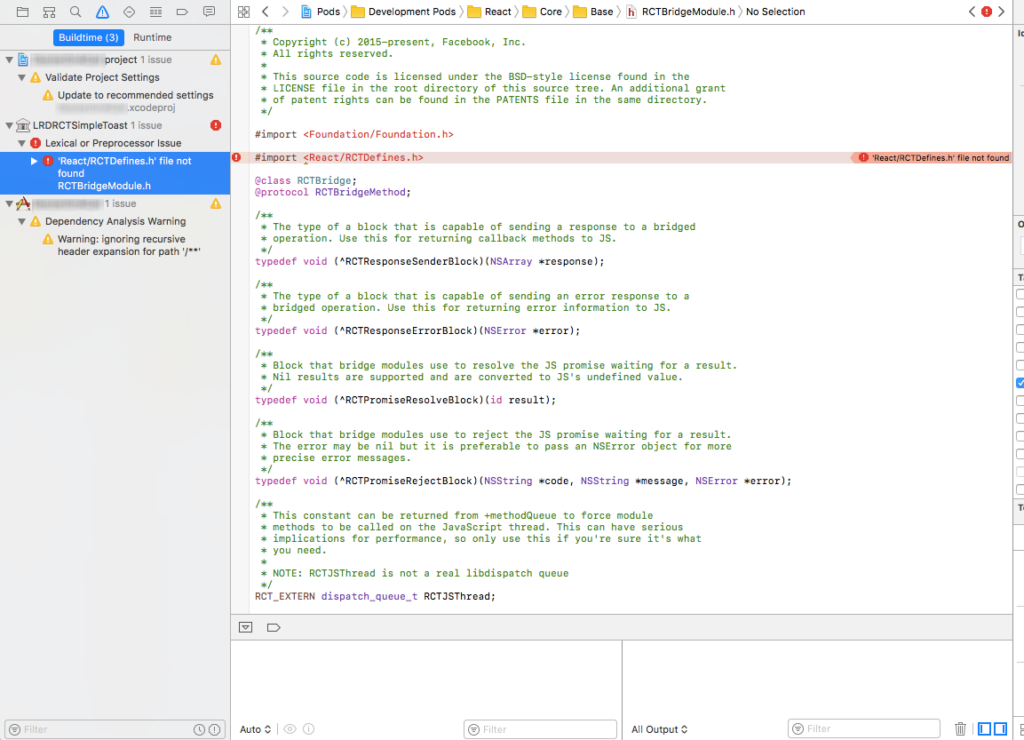
This error means that the library is not correctly set up with your React Native project.
To fix this error, go to your library settings. You will have to modify the Header Search Path input in Build Settings :

Go to Libraries > YourLib.xcodeproj > Targets > Build Settings > Search “Header Search Path”

“Header Search Path” should be in the section “Search Paths”. I recommend to use the search input because there are a lot of fields.

In my case, the external library named “RNReactNativeMstuneMam.xcodeproj” was doing the problem, so I am opening the settings of the xcodeproj file of this project. It can be any other library with another name, but you will have to fix the xcodeproj file, following to the error path that you have.

Now, double click to Header Search Paths and add:

${SRCROOT}/../../../ios/Pods/Headers
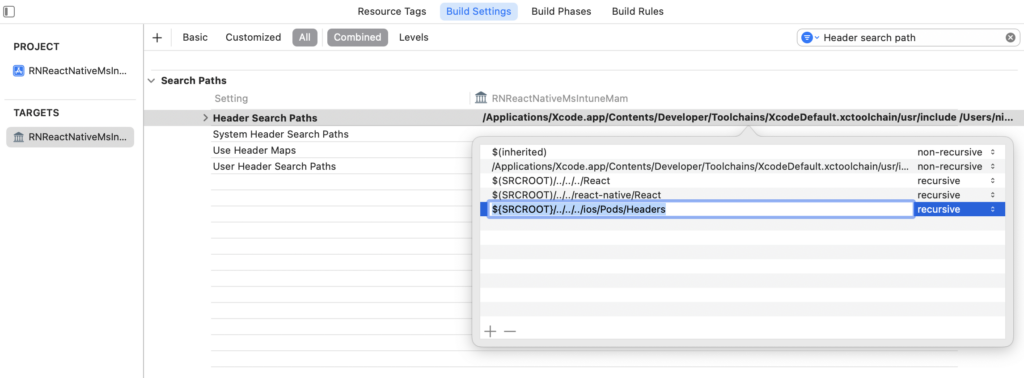
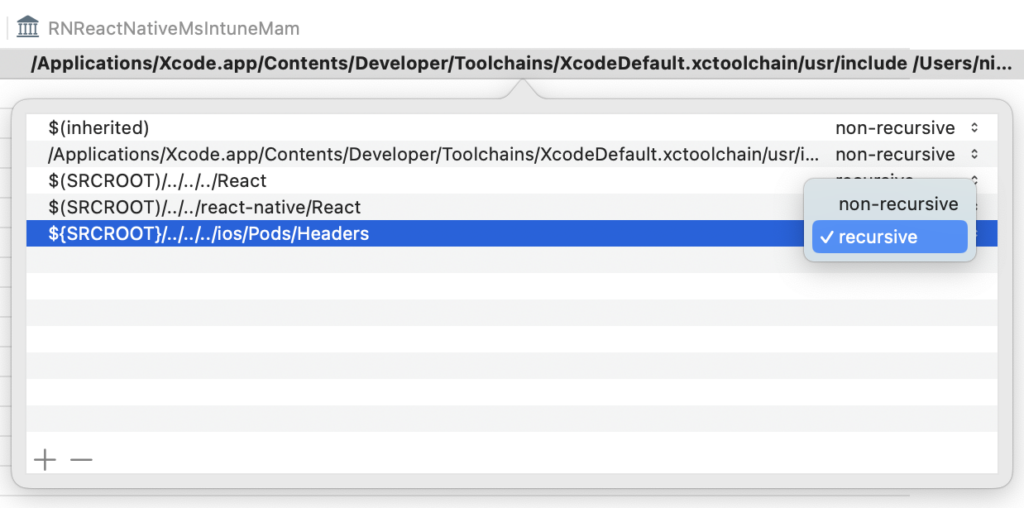
Add the entry ${SRCROOT}/../../../ios/Pods/Headers by double clicking

Set it to recursive:

set it to recursive

Now, you can clean and build again:

Clean project and build again

The error should not appear anymore as your library will find the Pods headers.

List of the array method with Javascript

.forEach()

const array = ["Alpha", "Beta", "Omega", "Neptune", "Danube", "Dniepr"];
array.forEach(el => console.log(el)) // basic
array.forEach((el, index, array) => console.log(el, index, array)) // all params
array.forEach(function(el, index, array) { // without arrow function
   return console.log(el, index, array)
})

.map()

const users = [
{name: "Alpha", level: 1}, 
{name: "Beta", level: 2}, 
{name: "Omega", level: 3}];
const names = users.map(user => user.name) // basic mapping in new array
console.log(names) // ["Alpha", "Beta", "Omega"]

.find() / .findIndex() / .indexOf()

const array = ["Alpha", "Beta", "Omega", "Neptune", "Danube", "Dniepr"];
console.log(array.find(el => el === "Alpha")) // ["Alpha"]
console.log(array.findIndex(el => el === "Alpha")) // 0
console.log(array.indexOf("Neptune")) // 3

The difference between indexOf and findIndex :
– findIndex : callback function so can do more things inside the callback function
– indexOf : using fast function with only one parameter

const users = [
{name: "Alpha", level: 1}, 
{name: "Beta", level: 2}, 
{name: "Omega", level: 3}];
console.log(users.find(el => el.name === "Alpha")) // [{name: "Alpha", level: 1}]

.some() / .every() / .includes()

const numbers = [12,14,23,27,11,9];
console.log(numbers.some(num => num === 40)) // false - do not have it
console.log(numbers.some(num => num === 12)) // true - yes have it
console.log(numbers.every(num => num < 20)) // false - not every item bellow 20
console.log(numbers.every(num => num < 40)) // true - yes every item bellow 40
console.log(numbers.includes(40)) // false - do not have it
console.log(numbers.includes(12)) // true - yes have it

.filter()

const numbers = [12,14,23,27,11,9];
const filteredNumbers = numbers.filter(num => num > 20) // [23, 27]

.sort()

Sort() works pretty good to order by ascending alphabetical order.
For numbers you will need to overload the condition in the callback function.

const numbers = [12,14,23,27,11,9];
const sortedNumbers = numbers.sort((a, b) => a - b) // [9, 11, 12, 14, 23, 27]
const array = ["Delta", "Neptune", "Alpha", "Danube", "Beta", "Dniepr"];
const sortedZone = array.sort() // ['Alpha', 'Beta', 'Danube', 'Delta', 'Dniepr', 'Neptune']

.reduce()

const numbers = [12,14,23,27,11,9];
const reducedNumbers = numbers.reduce((accumulator, currentValue) => accumulator + currentValue) // 96

Public Images for your React / Angular app on Google Cloud

We often need images in our React or Angular app, but putting them in the project is not clean.
So we can use Google Cloud with Cloud Storage for the images on your app.

There are many advantages of using Cloud Storage to expose public images :
– Real time maintenance (upload, delete, change, …)
– You don’t need any commit on your git (if you commit images on your Github / Gitlab for example)
– Clean project, only code files
– Light project repository to commit, images are heavy quickly

Create a Bucket

First, you need to create a Bucket (it’s like a big folder) if you don’t already have one.

Switch to Uniform access control

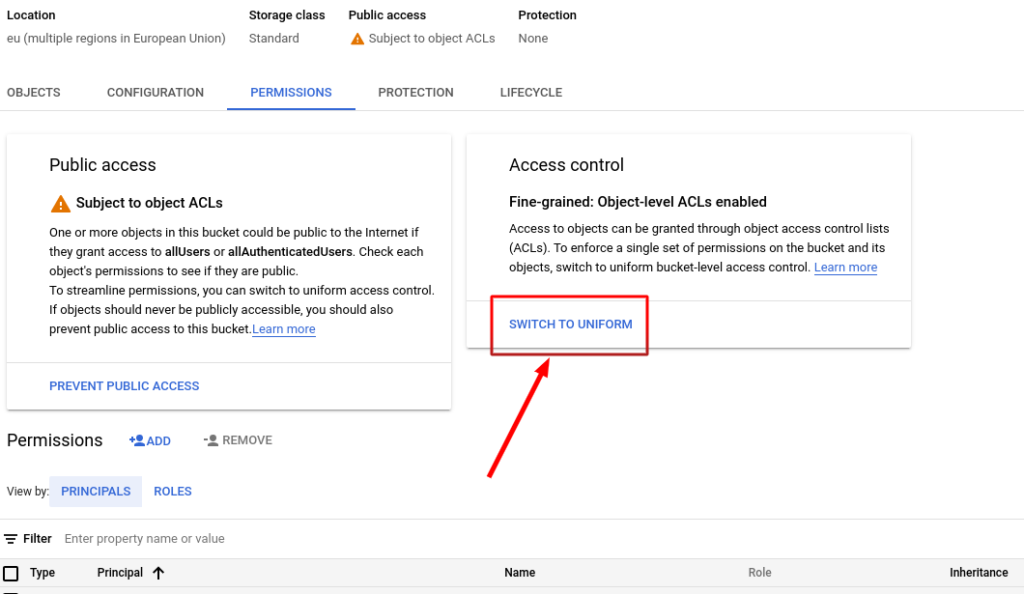
Then, to make your Bucket public, go to the Permissions tab, and change the access control to Uniform :

You should click Switch to Uniform, so you don’t have to make public each file one by one
You can see, if you upload your first image, that it’s not public yet

Add public access using by adding a Reader role for allUsers

You can then add the access of Object Reader to allUsers
Then you can see it’s Public to Internet and you are able to copy URL

You can now use you image anywhere, it’s on internet and anyone can see it with the URL, so you can use it to store images for your React / Angular app, all images will work.

Color picker with React.JS

Example of a color picker made with React.JS

In order to have a color picker on our React.JS application, we can use the SketchPicker library

Full example

Color: <TextField variant="outlined" id="standard-basic" style={{padding: 5, width: '90%', background: color}} value={color?color:''} onChange={(e) => { setColor(e.target.value); }} />
<SketchPicker 
   color={ color?color:'#fff' }
   onChangeComplete={ (colorSelected) => {
         setColor(`${colorSelected.hex}${decimalToHex(colorSelected.rgb.a)}`);
      } 
   }
   presetColors={['#D0021B', '#F5A623', '#F8E71C', '#8B572A', '#7ED321', '#417505', '#BD10E0', '#9013FE', '#4A90E2', '#50E3C2', '#B8E986', '#000000', '#4A4A4A', '#9B9B9B', '#FFFFFF']}
/>

Alerting user with a small messaga bubble – Snackbar – React.JS

In your web app, you will have to notice the user when he is doing some actions in your user interface. We can do it with a small message bubble called Snackbar, here is what it looks like:

How we will do it

setSnackSeverity("error");
setSnackMessage("The last cell cannot be deleted.");
setOpenError(true);

In your code, we will use these 3 lines to:
– Set the severity “error”, there are 4 types of severity

– Set the error message that will be displayed “The last cell cannot be deleted.”
– Show the error message (during few seconds)

Full example

import Snackbar from '@material-ui/core/Snackbar';
import MuiAlert, { AlertProps } from '@material-ui/lab/Alert';
function Alert(props) {
  return <MuiAlert elevation={6} variant="filled" {...props} />;
}
...
const [snackSeverity, setSnackSeverity] = useState('error');
const [openError, setOpenError] = useState(false);
const [snackMessage,setSnackMessage] = useState('Error');
...
setSnackSeverity("error");
setSnackMessage("The last cell cannot be deleted.");
setOpenError(true);
...
<Snackbar
   anchorOrigin={{ vertical: 'bottom', horizontal: 'right' }}
   open={openError}
   onClose={(e)=>setOpenError(false)}
   autoHideDuration={3000} 
   >
     <Alert onClose={(e)=>setOpenError(false)} severity={snackSeverity}>
       {snackMessage}
     </Alert>
</Snackbar>

React.JS • Full list of all icons

Examples of listing the icons in React.JS / React Native

Listing all the icons

List of all the icons

Searching icons name

Searching an icon name

How to do it ?

Importing all the icons

Import the CSS your icons in /public/index.html

<link rel="stylesheet" href="http://cdn.materialdesignicons.com/5.4.55/css/materialdesignicons.min.css" />

Use it in your source code

Use your icons in the code source in /src/App.js like that:

<span> 
   <i class={`mdi mdi-${icon?icon:''}`} aria-hidden="true"></i>
</span>

Loop on all icons

If you want a list of icons then you can loop on the list of icons, let’s say you have put all your icons in a file called iconlist.js

export const icons = [
"ab-testing",
"abjad-arabic",
"abjad-hebrew",
"abugida-devanagari",
"abugida-thai",
"access-point",
"access-point-check",
"access-point-minus",
"access-point-network",
"access-point-network-off",
"access-point-off",
"access-point-plus",
"access-point-remove",
"account",
"account-alert",
"account-alert-outline",
"account-arrow-left",
"account-arrow-left-outline",
"account-arrow-right",
"account-arrow-right-outline",
"account-box",
"account-box-multiple",
"account-box-multiple-outline",
"account-box-outline",
"account-cancel",
"account-cancel-outline",
"account-cash",
"account-cash-outline",
"account-check",
...
];

Then you can import the icons in you App.js and use it:

import { icons } from './icons';
...
{ icons.map((icon, index) => (
   <div style={{fontWeight: 'bold'}}> <i class={`mdi mdi-${icon}`} aria-hidden="true"></i> {icon} </div>
))}

You can then add a filter if you want to check that the icons contain part of the string name :

const [searchIcon, setSearchIcon] = useState(null);
...
{ icons.filter(icon => icon.includes(searchIcon) ).map((icon, index) => (
    <div style={{fontWeight: 'bold'}}> <i class={`mdi mdi-${icon}`} aria-hidden="true"></i> {icon} </div>
  )
)}

ReactJS • Responsive UI interface

You are making a React application and you want to have a responsive user interface that works both on laptop and mobile phone ?

A solution can be to use Material UI with several layout components such :

  • Container
  • Grid
  • Hidden

The grid looks like this:

<Grid container spacing={3}>
        <Grid item xs={12}>
          <Paper className={classes.paper}>xs=12</Paper>
        </Grid>
        <Grid item xs={6}>
          <Paper className={classes.paper}>xs=6</Paper>
        </Grid>
        <Grid item xs={6}>
          <Paper className={classes.paper}>xs=6</Paper>
        </Grid>
        <Grid item xs={3}>
          <Paper className={classes.paper}>xs=3</Paper>
        </Grid>
        <Grid item xs={3}>
          <Paper className={classes.paper}>xs=3</Paper>
        </Grid>
        <Grid item xs={3}>
          <Paper className={classes.paper}>xs=3</Paper>
        </Grid>
        <Grid item xs={3}>
          <Paper className={classes.paper}>xs=3</Paper>
        </Grid>
      </Grid>

As you can see, the full width of the page is xs=12. It means the full width size is equal to 12.


You can see so that with 2 grid items of xs=6, it will be two components.
And so 4 will be 3 components on the line and 3 will be 4 components on the line.

You can use this grid items when you want to display block of contents on the page, if you know Bootstrap, it’s the same.

You can put any content inside your <Grid>, it can be a <div> for example.

Using XS, SM, MD, LG and XL

Grid SizeDeviceWeb browser width
XSMobile phone screens 0px ► 600x
SMMobile phone and tablets600px ► 960px
MDLaptop960px ► 1280px
LGLaptop1280px ► 1920px
XLDesktop1920px ► …

Using breakpoints

Using breakpoints allow you to have different grid size for different devices, which allows you to have a grid adapted for mobile phone for exemple:

You can se the size 6 for laptop (SM=6 and higher) and size is 12 for mobile phone (XS=12)

Using Hidden

You can use the <Hidden> element from Material UI to hide specific items for XS/SM/MD/LG/XL items.

<Hidden only="lg">
    <Paper className={classes.paper}>Hidden on lg</Paper>
</Hidden>

OnClick inside OnClick with React

While doing some test after putting the event OnClick in a DIV inside another DIV with the Onclick event, I was not able to trigger the OnClick event that was inside the other.

<div id="div1" style={{background: 'red'}} onClick={() => { 
setClicked('div1');
}>
  DIV 1
  <div id="div2" style={{background: 'green'}} onClick={() => { 
  console.log('you clicked div2');
  setClicked('div2');
  }>
    DIV 2
  </div>
</div>
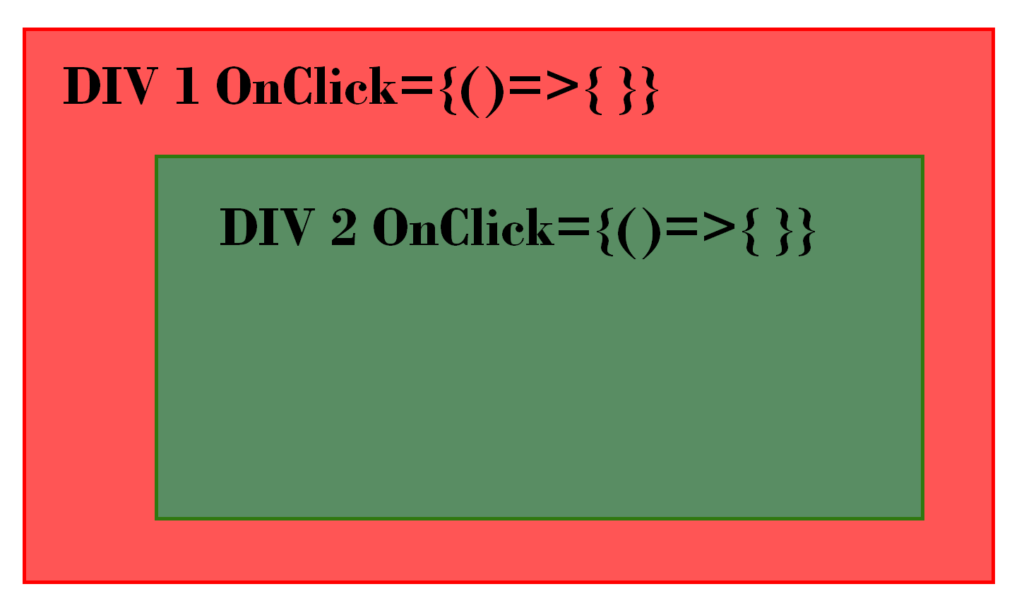
When we click on the DIV 2, it triggers the DIV 1 onClick event

If you click on the green div, and then, if you check the logs you see that the log is working, you triggered the event.
But, if you check your state, you will see that it’s div1, and not div2, but you clicked DIV 2.
Your click action has been propagate to the DIV 2.

How to solve the problem

In order to solve this problem, we will need a fix. So we can trigger both events.
The problem is that the click action is propagate to the the other div.
So, we need to check when you trigger the onClick action that the user clicked on the good one.
To do so, we can add the following instructions in the inner DIV:

if(event.target !== event.currentTarget) return;

Which will give:

<div id="div1" style={{background: 'red'}} onClick={(event) => { 
if(event.target !== event.currentTarget) return;
setClicked('div1');
}>
  DIV 1
  <div id="div2" style={{background: 'green'}} onClick={() => { 
  console.log('you clicked div2');
  setClicked('div2');
  }>
    DIV 2
  </div>
</div>

With buttons inside a DIV with 3 levels DIV

If you have 3 levels of DIV and you want only the action of the button of the div the be triggered then you can use the following instruction in the end of the OnClick:

<div id="div3" style={{background: 'yellow'}} onClick={(event)=>{
...
event.stopPropagation();
}}/>

stopPropagation will stop the click event and so the second OnClick event will not be triggered.