Nicolas BAPTISTA - Page 3 of 6 - Blog of a Parisian software architect

This blog contains 60 articles

N I C O L A S    B A P T I S T A

PERSONNAL BLOG

SOFTWARE ARCHITECT • JAVASCRIPT DEVELOPER • DESIGNER


LinkedIn Contact Github Remote OK Resume My Projects

React native with Android – Fix : Device unauthorized

Check developer is enabled in the phone settings

One reason your phone is not detected is that you don’t have enabled the developer mode in the Android Settings.

Check the connected android devices with adb devices

Now you can check if your phone is connected with adb devices

sh-3.2# adb devices
* daemon not running; starting now at tcp:5037
* daemon started successfully
List of devices attached
CBAA004484J41536762     unauthorized

Authorise your device with adb kill-server and adb devices

If your phone still not asking anything while connected, you can force the adb service to restart like that:

sh-3.2# adb kill-server
sh-3.2# adb devices
* daemon not running; starting now at tcp:5037
* daemon started successfully

Then now you should be able to see a message on your phone asking if you authorise the computer.
Now you should be able to do your react-native run-android or yarn android

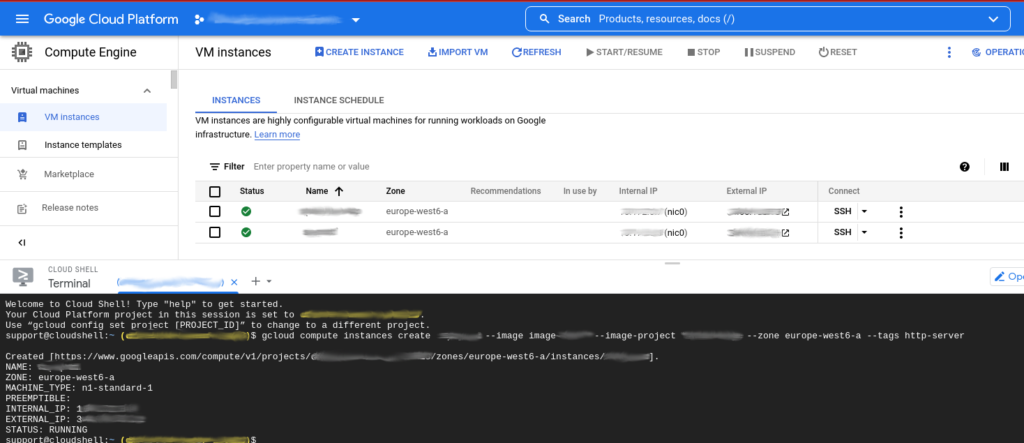
Start Google Cloud instance VM from a shared image from another Project / Organization

If you have multiple projects or organization and you want to clone a machine that is already configured, you can create an image of the instance of the machine.
But, you will have to share the access to the external project and organization.
Here is how to do it :

Share the image to the organization in the Images and in IAM

In both IAM and Image (VM) you will have to share the access Compute Image User

Start the VM using the shared image from another project / organization

gcloud compute instances create INSTANCE-NAME --image SHARED-IMAGE-NAME --image-project PROJECT-NAME --zone ZONE --tags http-server
  • INSTANCE-NAME : Name of the VM instance you are creating (that will appear in the VM list)
  • SHARED-IMAGE-NAME : The name of the image you shared to the organization
  • PROJECT-NAME : The name if the project where is the image you shared to the organization
  • ZONE : The geographical zone of the VM

Now the machine is started from an image from another organization and project !

Mac M1 : react native iOS mobile app on Simulator

I decided to make an article because I spent almost 5 days on this problem, and I don’t want it never happen. So let me help all the people that can be in the same case of me.

– You have a Mac M1 running on ARM 64 architecture
– You are working on a React Native or Swift project with Xcode

Exclude the ARM architecture in the Podfile

Add the following lines in the Podfile (/ios/Podfile) :

    post_install do |installer|
      ## FIX MAC M1 ARM
      react_native_post_install(installer)
      installer.pods_project.build_configurations.each do |config|
        config.build_settings["EXCLUDED_ARCHS[sdk=iphonesimulator*]"] = "arm64"
      end
    end

You should check that there is only one “post_install” in the file, if there is not you can add it at the end of the file, if there is already “post_install” somewhere, just put the instructions to exclude the architecture ARM 64 at the end of the “post_install” section.

Dependencies with CocoaPods

In the /ios folder of your React Native project, you should run the following command to build all the dependancy in the /Pods folder :

sudo arch -x86_64 pod install --allow-root

or, you can also use pod-install to be sure all is installed:

npx pod-install

In case of error: Delete /Pods folder, delete Podfile.lock and start again. In case of error of dependancies in node_modules, delete node_modules and run yarn.

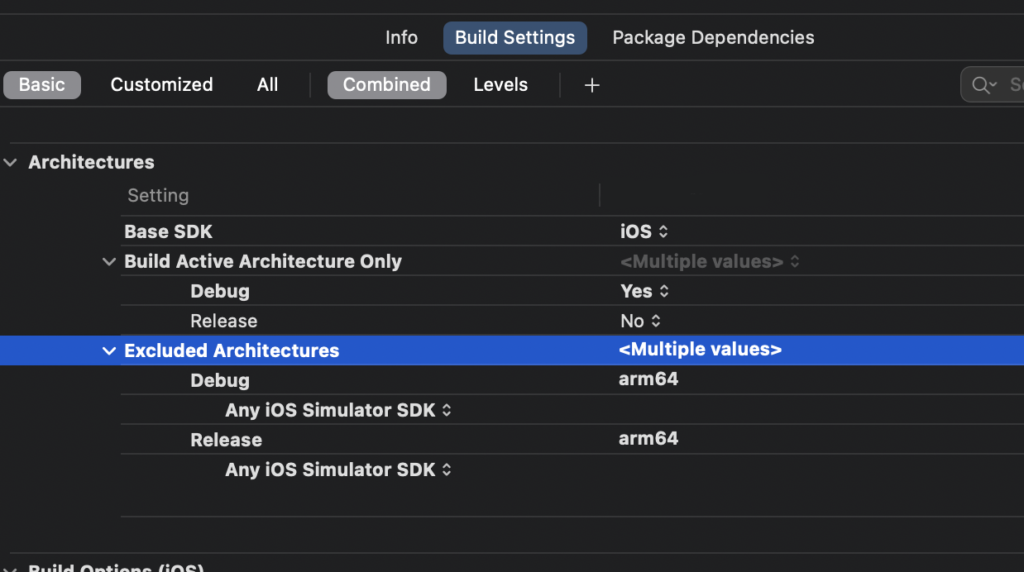
Exclude the ARM architecture in Xcode

Now, you should also exclude the architecture in the project settings in Xcode :

Exclude the architecture “arm64” in Project > Build Settings > Architectures

Then if you start the react native project on Simulator it should works !

How to solve error SQL Import Google Cloud

Is it possible that when you try to import a backup of your MySQL database on Google Cloud, you have the following error :

We are trying to import a backup in Google Cloud SQL
The following error appears in the logs
error: exit status 1 stdout(capped at 100k bytes): stderr: ERROR 3546 (HY000) at line 26: @@GLOBAL.GTID_PURGED cannot be changed: the added gtid set must not overlap with @@GLOBAL.GTID_EXECUTED

To solve the problem, open the SQL file with text editor and search the error “@@GLOBAL.GTID_EXECUTED”

After modifying the *.sql file, you should be able to import successfully :

It should now work

Renew automatically HTTPS SSL certificates with cron and Certbot

Use the command crontab -e to edit the crontab (recurring tasks), and insert the following line:

0 0 1 * * /usr/bin/certbot renew --pre-hook “service nginx stop” --post-hook “service nginx start” --quiet > /etc/letsencrypt/renewals.log

It will renew all the certificates, the 1st of each month (0 0 1 * *), and will stop nginx before the renewal and start nginx after the renewal so it can works.
It will work on all the linux servers.

AWS Amplify : Babel error building React.JS app

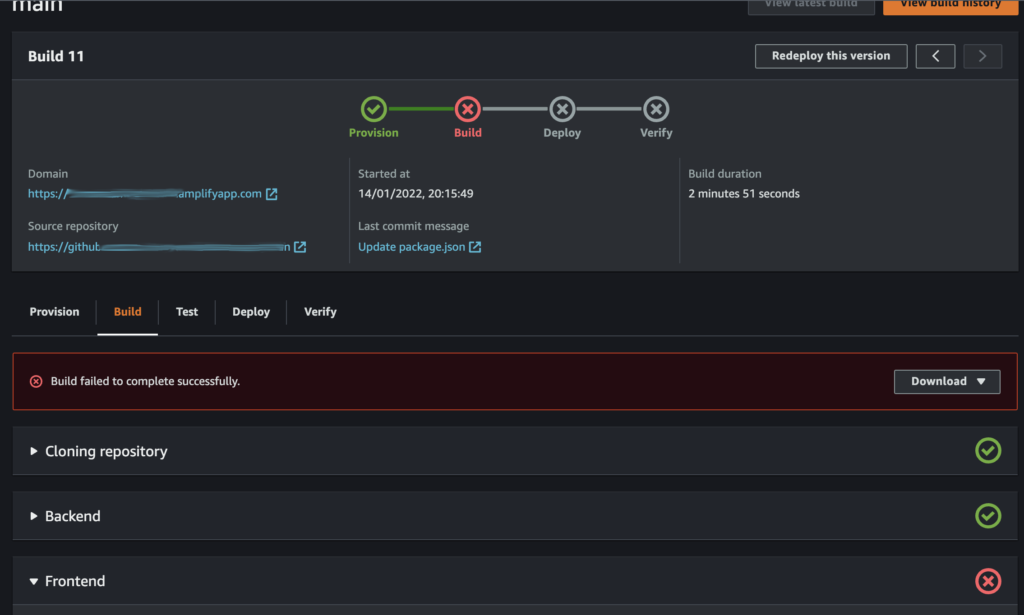
Is it possible you may have an error with babel on AWS Amplify, while deploying your React.JS app:

If you click on Frontend you should be able to see the logs :

2022-01-14T17:18:36.441Z [INFO]: $ react-scripts build
2022-01-14T17:18:37.352Z [INFO]: Creating an optimized production build...
2022-01-14T17:18:38.431Z [INFO]: Failed to compile.
2022-01-14T17:18:38.433Z [INFO]: ./src/index.js
                                 Error: [BABEL] /codebuild/output/src483533555/src/app/src/index.js: Cannot find module '@babel/helper-define-map'
                                 Require stack:
                                 - /codebuild/output/src483533555/src/app/node_modules/babel-preset-react-app/node_modules/@babel/plugin-transform-classes/lib/transformClass.js
                                 - /codebuild/output/src483533555/src/app/node_modules/babel-preset-react-app/node_modules/@babel/plugin-transform-classes/lib/index.js
                                 - /codebuild/output/src483533555/src/app/node_modules/babel-preset-react-app/node_modules/@babel/preset-env/lib/available-plugins.js
                                 - /codebuild/output/src483533555/src/app/node_modules/babel-preset-react-app/node_modules/@babel/preset-env/lib/plugins-compat-data.js
                                 - /codebuild/output/src483533555/src/app/node_modules/babel-preset-react-app/node_modules/@babel/preset-env/lib/normalize-options.js
                                 - /codebuild/output/src483533555/src/app/node_modules/babel-preset-react-app/node_modules/@babel/preset-env/lib/index.js
                                 - /codebuild/output/src483533555/src/app/node_modules/babel-preset-react-app/create.js
                                 - /codebuild/output/src483533555/src/app/node_modules/babel-preset-react-app/index.js
                                 - /codebuild/output/src483533555/src/app/node_modules/react-scripts/node_modules/@babel/core/lib/config/files/plugins.js
                                 - /codebuild/output/src483533555/src/app/node_modules/react-scripts/node_modules/@babel/core/lib/config/files/index.js
                                 - /codebuild/output/src483533555/src/app/node_modules/react-scripts/node_modules/@babel/core/lib/index.js
                                 - /codebuild/output/src483533555/src/app/node_modules/react-scripts/node_modules/babel-loader/lib/index.js
                                 - /codebuild/output/src483533555/src/app/node_modules/loader-runner/lib/loadLoader.js
                                 - /codebuild/output/src483533555/src/app/node_modules/loader-runner/lib/LoaderRunner.js
                                 - /codebuild/output/src483533555/src/app/node_modules/webpack/lib/NormalModule.js
                                 - /codebuild/output/src483533555/src/app/node_modules/webpack/lib/NormalModuleFactory.js
                                 - /codebuild/output/src483533555/src/app/node_modules/webpack/lib/Compiler.js
                                 - /codebuild/output/src483533555/src/app/node_modules/webpack/lib/webpack.js
                                 - /codebuild/output/src483533555/src/app/node_modules/react-scripts/scripts/build.js (While processing: "/codebuild/output/src483533555/src/app/node_modules/babel-preset-react-app/index.js")
2022-01-14T17:18:38.451Z [WARNING]: error Command failed with exit code 1.
2022-01-14T17:18:38.451Z [INFO]: info Visit https://yarnpkg.com/en/docs/cli/run for documentation about this command.
2022-01-14T17:18:38.461Z [ERROR]: !!! Build failed
2022-01-14T17:18:38.461Z [ERROR]: !!! Non-Zero Exit Code detected
2022-01-14T17:18:38.461Z [INFO]: # Starting environment caching...
2022-01-14T17:18:38.461Z [INFO]: # Uploading environment cache artifact...
2022-01-14T17:18:38.534Z [INFO]: # Environment caching completed
Terminating logging...

In order to solve the @babel errors, you will need to install all the @babel packages:

NPM

npm install babel-core babel-loader babel-preset-env 
babel-preset-react babel-polyfill babel-runtime @babel/helpers 
@babel/helper-builder-react-jsx-experimental @babel/helper-builder-react-jsx 
@babel/helper-define-map @babel/helper-plugin-utils @babel/helper-regex

YARN

yarn add babel-core babel-loader babel-preset-env 
babel-preset-react babel-polyfill babel-runtime @babel/helpers 
@babel/helper-builder-react-jsx-experimental @babel/helper-builder-react-jsx 
@babel/helper-define-map @babel/helper-plugin-utils @babel/helper-regex

In order to run your React.JS project on Amplify, here is all the babel packages I installed to solve all problems:

  • babel-core
  • babel-loader
  • babel-preset-env
  • babel-preset-react
  • babel-polyfill
  • babel-runtime
  • @babel/helpers
  • @babel/helper-builder-react-jsx
  • @babel/helper-builder-react-jsx-experimental
  • @babel/helper-define-map
  • @babel/helper-plugin-utils
  • @babel/helper-regex

After, that, you should be able to see your React.JS app online with Amplify:

Les idées de Robert Kiyosaki dans le livre “Père Riche Père Pauvre”

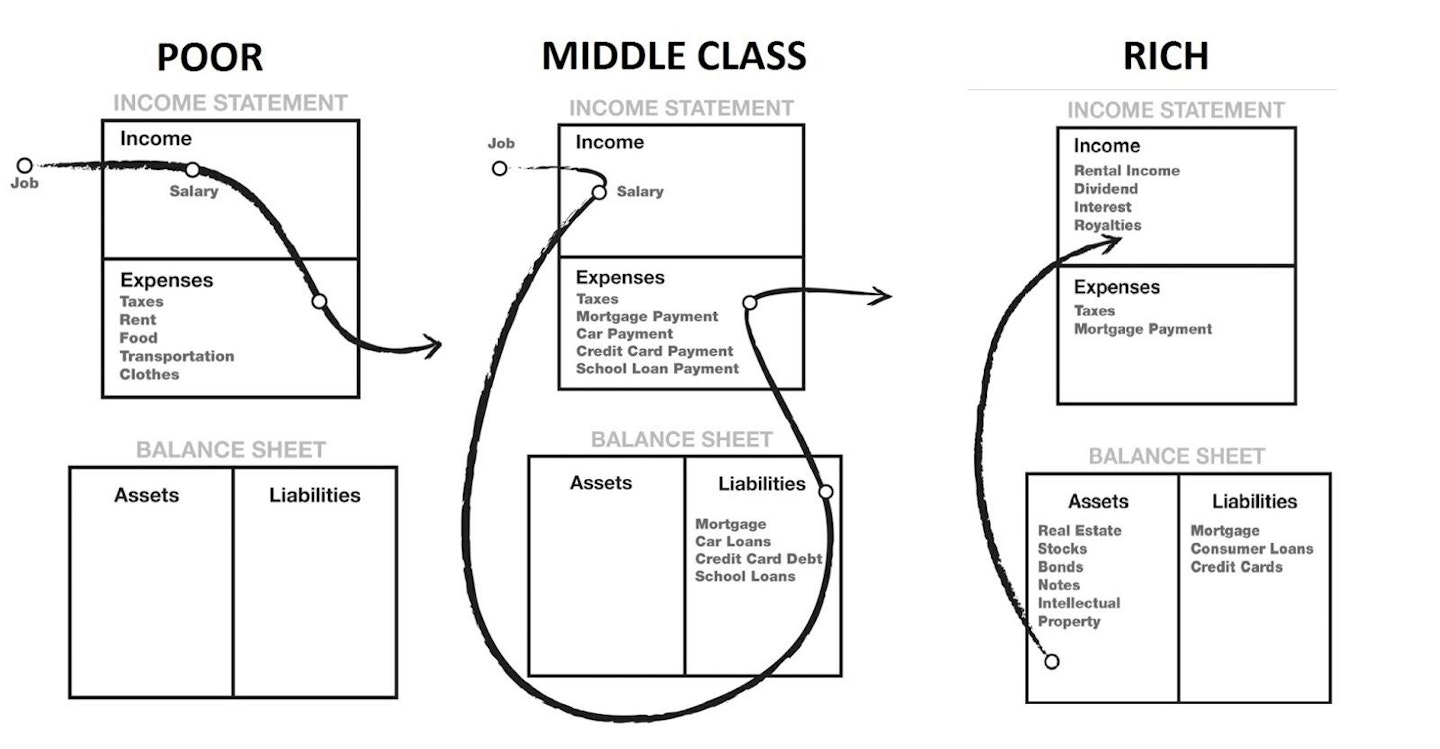
La plupart des idées de Robert Kiyosaki dans son célèbre livre “Père Riche, Père Pauvre” se résume dans plusieurs schéma qui résume les différents engrenages des personnes des différentes classes. Notamment au niveau de leurs “actifs”, leurs entrées d’argents, et leur “passifs”, leurs dépenses.

Résumé Père riche père pauvre : 6 leçons clés

Mind Parachute nous résume également l’idée du livre dans sa vidéo, où il est expliqué la plupart des principes du livre.

Ce que les riches savent sur l'argent : Père riche, père pauvre de Robert  Kiyosaki | Mind Parachutes

On peut qualifier l’auteur comme réaliste ou fataliste, donc ayez un esprit assez ouvert et critique pour comprendre votre situation et l’accepter, pour ensuite pouvoir évoluer vers la situation que vous souhaitez, par exemple l’indépendance financière et ne pas dépendre des systèmes de retraite de l’état.

Egalement, je trouve intéressant la partie présentant les 4 façons de générés des revenus:

  • Salarié
  • Indépendant
  • Business (avoir un système qui génère des revenus)
  • Investisseur

Comparison of price of Big King XXL (Burger King) in the world in EURO

I made this article in a purpose to know the cost of living across the world, this has not been made for commercial purpose and has been made for real analytic results on the cost of living.

FRANCE

Menus - Photo de Burger King, Villars - Tripadvisor

MENU BIG KING XXL : 8.80 EUR

GERMANY

Burger King Germany Price list / Menu - Joy Della Vita

MENU BIG KING XXL : 8.49 EUR (-0.31 EUR, -3.5%)

RUSSIA

MENU BIG KING XXL : 469.99 RUB = 5.63 EUR (-3.17 EUR, -36%)

MOROCCO

Burger King Tanger MENU 2021 | Livraison à Domicile | Les meilleurs  Restaurants à Tanger- EAT.MA

MENU BIG KING XXL : 65 DHS = 6.23 EUR (-2.57 EUR, -29.2%)

TURKEY

İstanbul Havalimanı'nda Burger King | Gökyüzü Haberci

MENU BIG KING XXL : 67 TL = 5.84 EUR (-2.96 EUR, -33.6%)

ITALY

Burger King Menu, Menu for Burger King, Eur, Roma

MENU BIG KING XXL : 7.40 EUR (-1.4EUR, -15.9%)

CZECH REPUBLIC

MENU BURGER KING XXL : 199 CZK = 7.89 EUR (-0.91 EUR, -10.3%)

Import / Export MySQL Workbench tables in Google Cloud SQL database

If you have a database on Google Cloud and you want to import and export some tables to another database, you will need a database explorer to export your .SQL backup.

Export the tables you want in database

Google Cloud interface only allow to export all a database or a specific database, but not tables

As you can see you don’t have the option to select tables.
To do so, you will have to connect the database with a SQL explorer.
In MySQL Workbench you should go in Server > Data Export

Then you should be able to select the tables you want

select Export to Self-Contained File to have a .SQL file

Import the SQL file to Google Cloud

You will need to upload the SQL file to Google Cloud in order to import it. In order to do it, go to Google Cloud > Cloud Storage, create the bucket if it doesn’t exist yet :

create the bucket dedicated for SQL, with random numbers, to have a unique name
Upload the SQL file generated by MySQL Workbench

Then, you can go on Google Cloud > SQL > Import

Select the SQL file from the bucked and select the database you want the tables to be imported

And then you should have imported successfully the tables on the selected database. You should check it in Operations


In case of errors, check the error in Operations, and modify the .SQL file with a text editor, search the error in the SQL file and remove the lines, and repeat the process (upload it again to Google Cloud Storage and import the SQL file again)

Public Images for your React / Angular app on Google Cloud

We often need images in our React or Angular app, but putting them in the project is not clean.
So we can use Google Cloud with Cloud Storage for the images on your app.

There are many advantages of using Cloud Storage to expose public images :
– Real time maintenance (upload, delete, change, …)
– You don’t need any commit on your git (if you commit images on your Github / Gitlab for example)
– Clean project, only code files
– Light project repository to commit, images are heavy quickly

Create a Bucket

First, you need to create a Bucket (it’s like a big folder) if you don’t already have one.

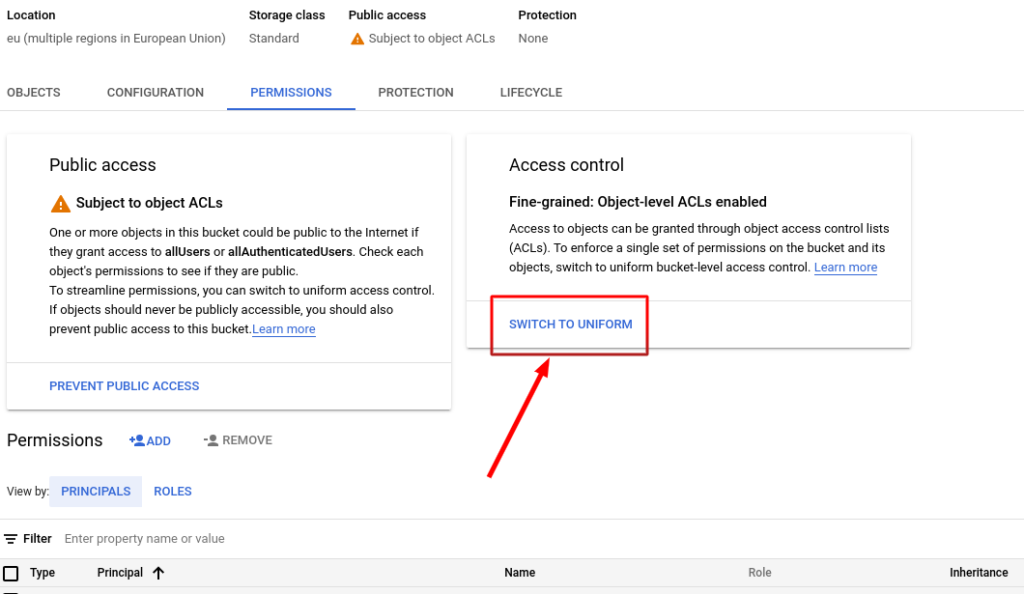
Switch to Uniform access control

Then, to make your Bucket public, go to the Permissions tab, and change the access control to Uniform :

You should click Switch to Uniform, so you don’t have to make public each file one by one
You can see, if you upload your first image, that it’s not public yet

Add public access using by adding a Reader role for allUsers

You can then add the access of Object Reader to allUsers
Then you can see it’s Public to Internet and you are able to copy URL

You can now use you image anywhere, it’s on internet and anyone can see it with the URL, so you can use it to store images for your React / Angular app, all images will work.

моя жизнь - дерьмо